Purple Ninja Turtle Tutu Dress Tutorial | How To Make A Ribbon Edged Tutu Dress
Posted by The Hair Bow Company on Sep 29th 2016
Whether you're looking for instructions on how to make a tutu with ribbon along the edges of the tulle skirt, or you're a fan of those teenage oversized turtles and are in search of costume inspiration, you've come to the right place!
This tutu dress style is a little more advanced than your basic tulle and crochet tutu top tutu dress, if you've got a sewing machine and the ability to sew in a fairly straight line, you can make this dress! It just takes patience to get started, then it really does fly from there.
So, let's get started!
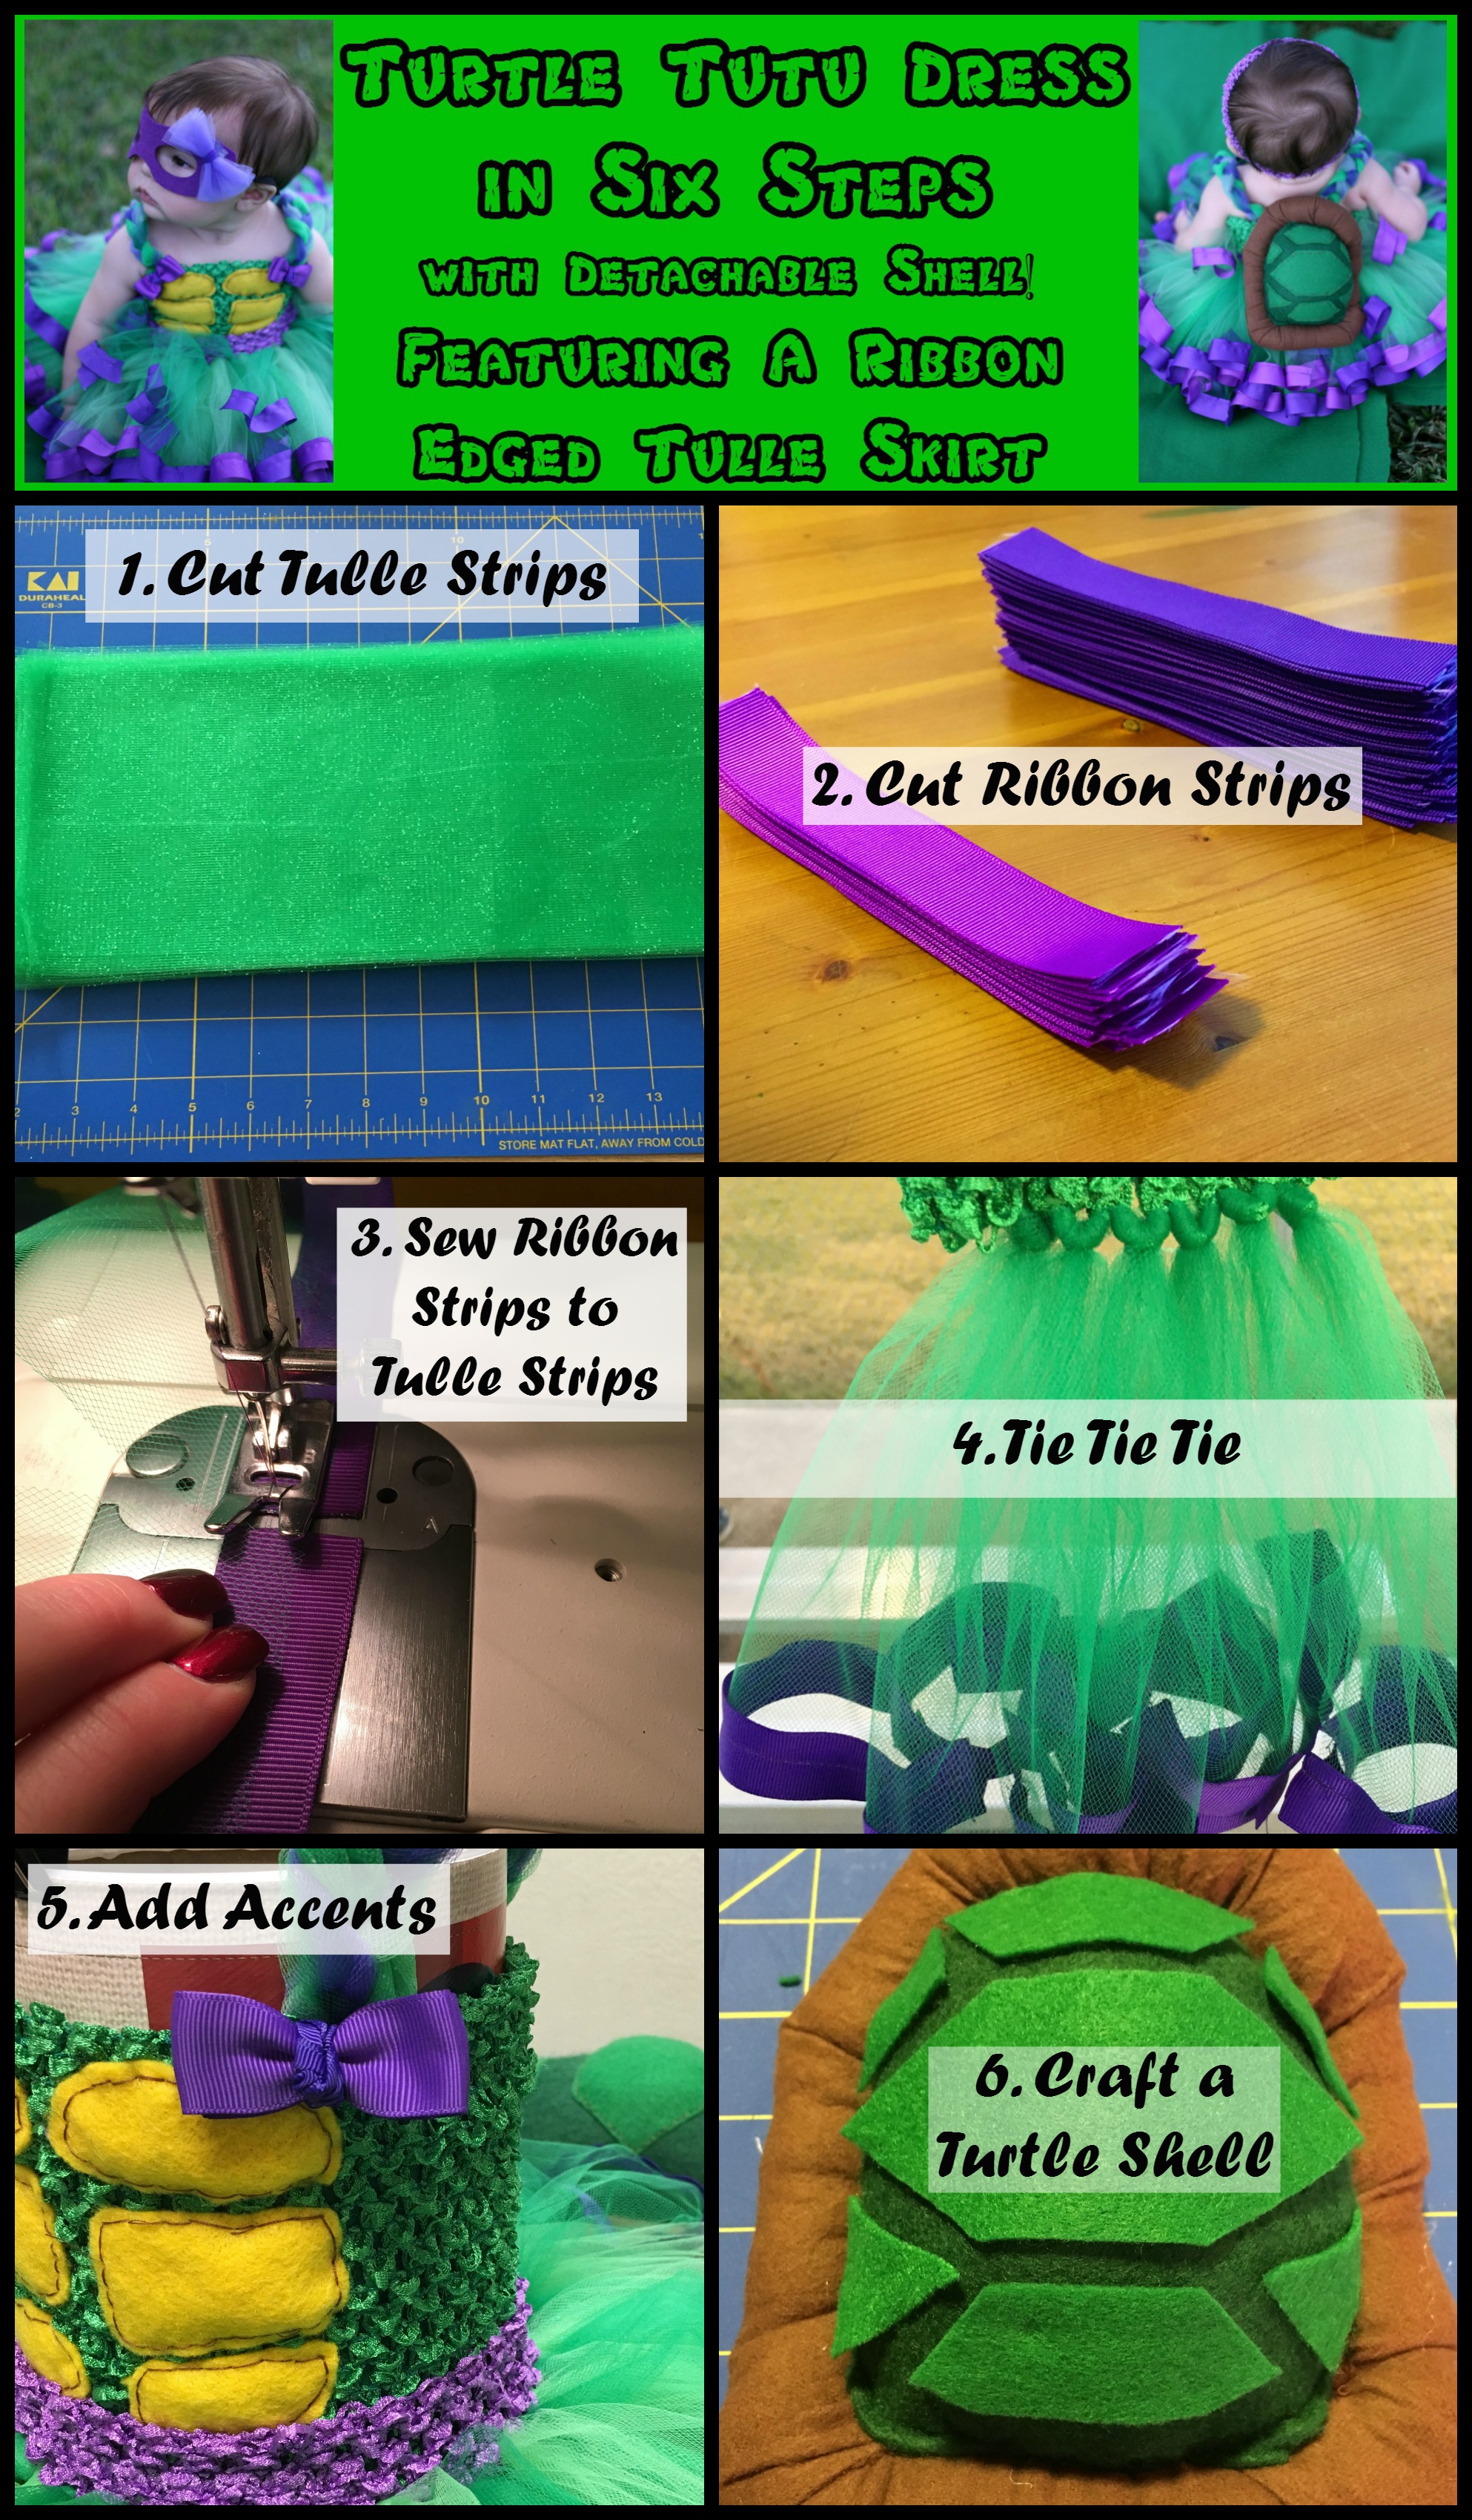
That was obviously the quick, no frills version of the instructions. If you need just a little more detail than that, hang out with me for a bit longer and I'll walk you through the more in-depth journey of making this Donatello inspired tutu dress. (If you're a fan of one of the other three turtles in this quartet, simply use the applicable colors for your ribbon and accents. I'm actually a Raphael fan, but I really liked how the purples looked with the greens.)
Note: The instructions and measurements below are for an infant turtle ribbon edged tutu dress, ideal for ages 6-12 months. Increase the quantities/measurements if you are making a larger dress or want a longer skirt. Also, I used varying shades of green and purple as I like the dimension it gives to the skirt, but you can just as easily use one color for each material. Again, just adjust your measurements and resulting quantities of materials accordingly.
Materials Needed:
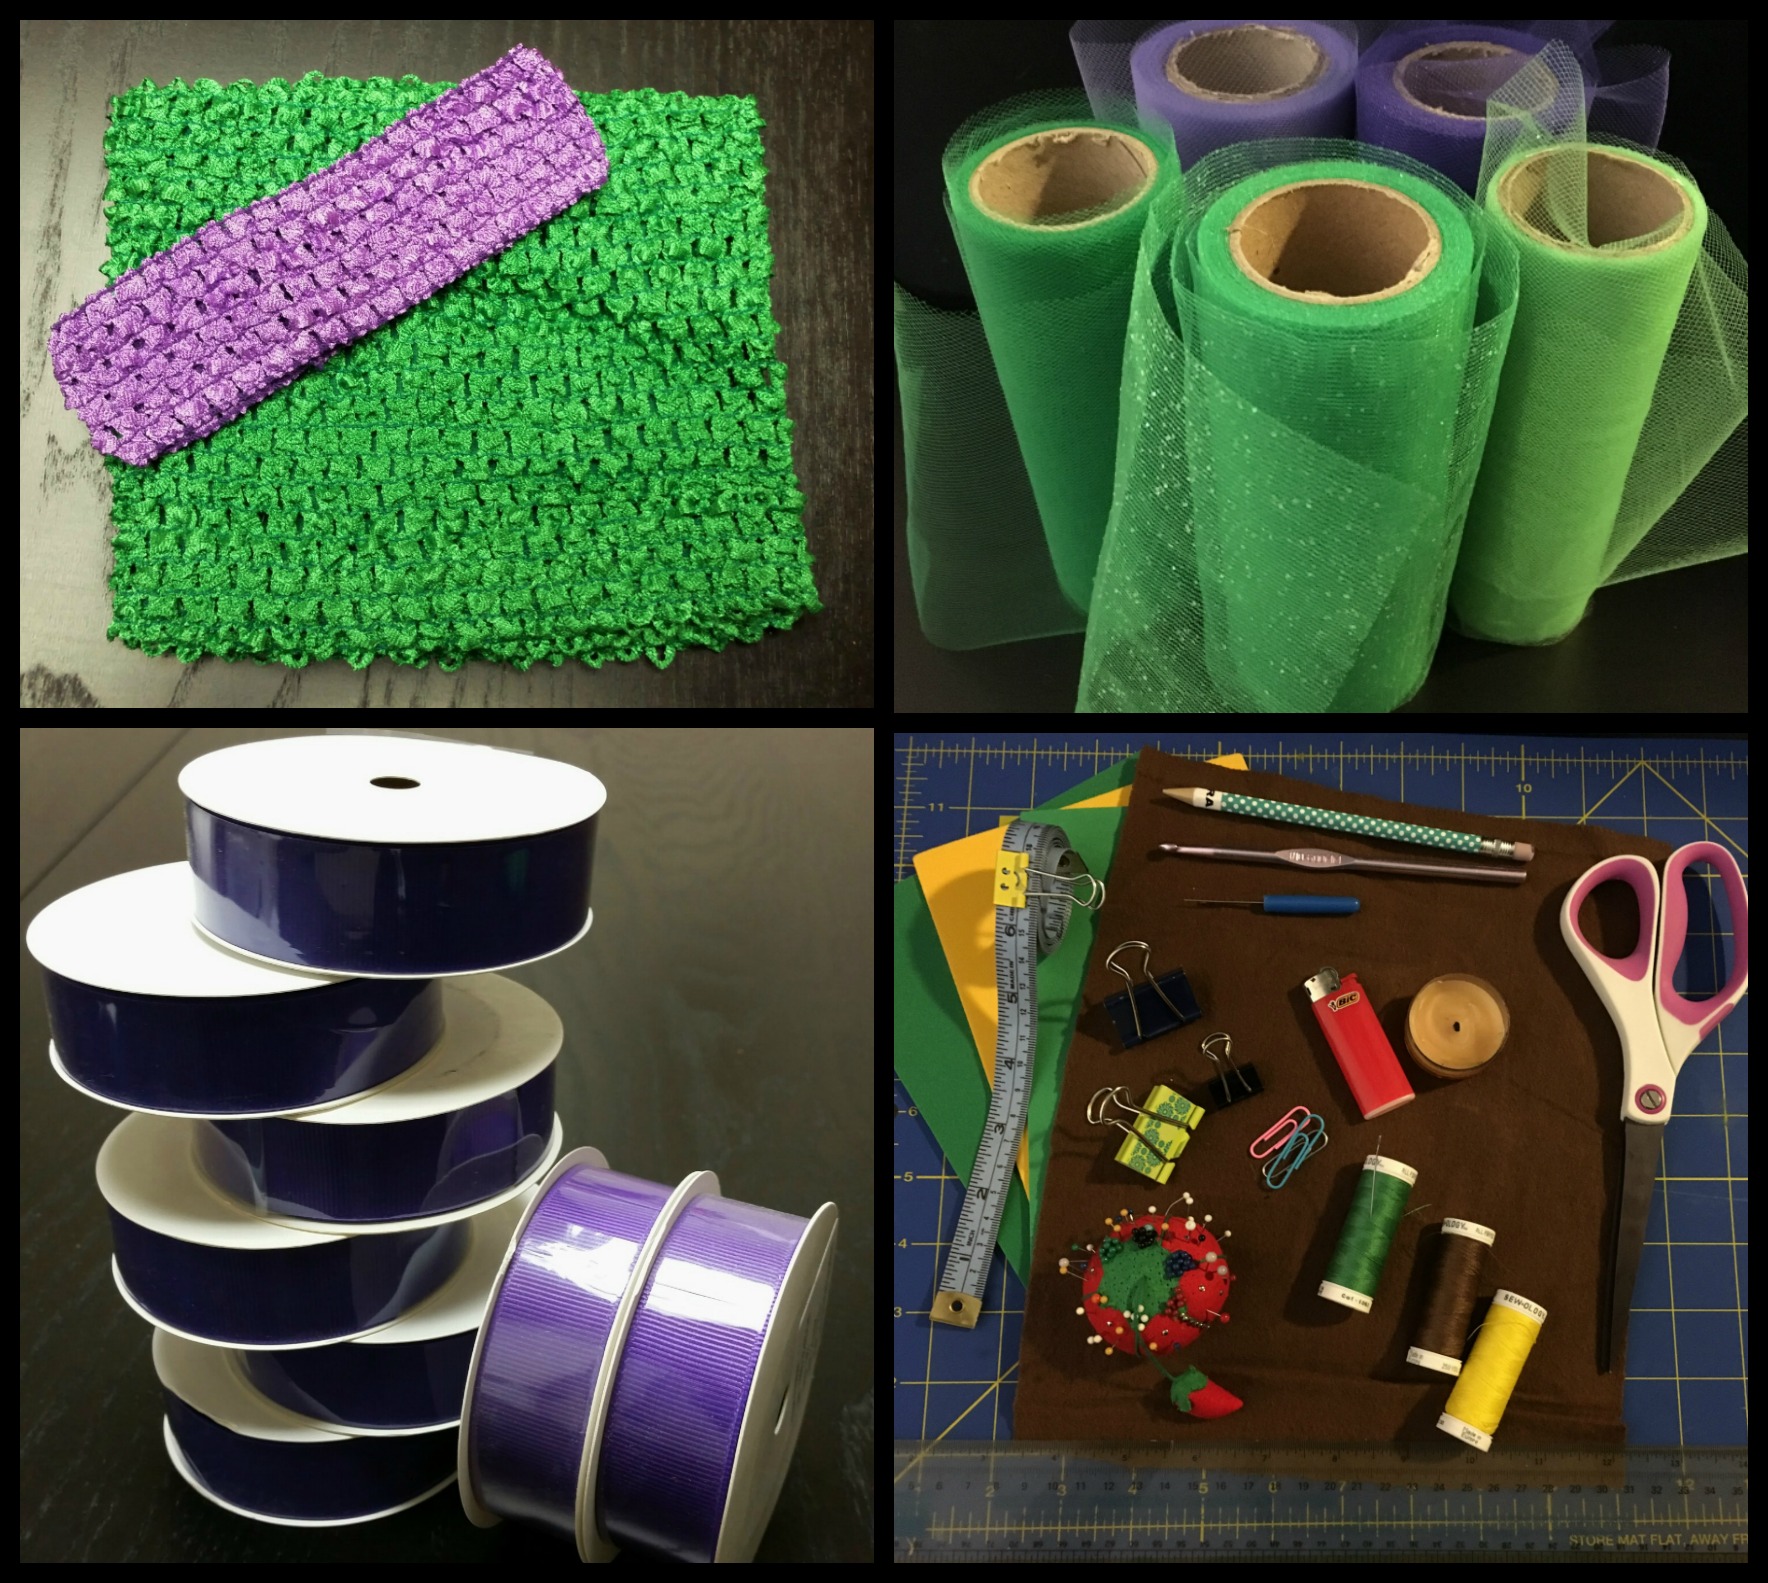
1 - 7" Lined Crochet Tutu Top (Kelly Green)
1 - 1.5" Crochet Headband (Purple)
1 - 100% Nylon Tulle (Kelly Green) 6" wide
1 - 100% Nylon Tulle (Lime Green) 6" wide
1 - Glitter Tulle By The Roll (Kelly Green) 6" wide
1 - 100% Nylon Tulle (Deep Purple) 6" wide
1 - 100% Nylon Tulle (Lavender) 6" wide
2 - 7/8" Grosgrain Ribbon Spools (Purple)
6 - 7/8" Grosgrain Ribbon Spools (Regal Purple)
1/4 yd each - Felt Material (Green, Dark Green, Brown) (Fleece is another good choice!)
Thread - Brown and Green to match the felt/tutu, Purple to match the ribbon (pretend the yellow thread in the picture is actually purple!)
1 - Button
Sewing Machine & Dress Form (aka Oatmeal Canister for me!) - not pictured
Bits & Pieces to help make the process easier and successful:
Scissors, crochet hook, lighter & tea light, pins, sewing needle, pencil, seam ripper (because I am by no means a master seamstress!), ruler, tape measure, binder clips/paper clips
Step 1: Cutting the Tulle Strips
WARNING: MATH Ahead!
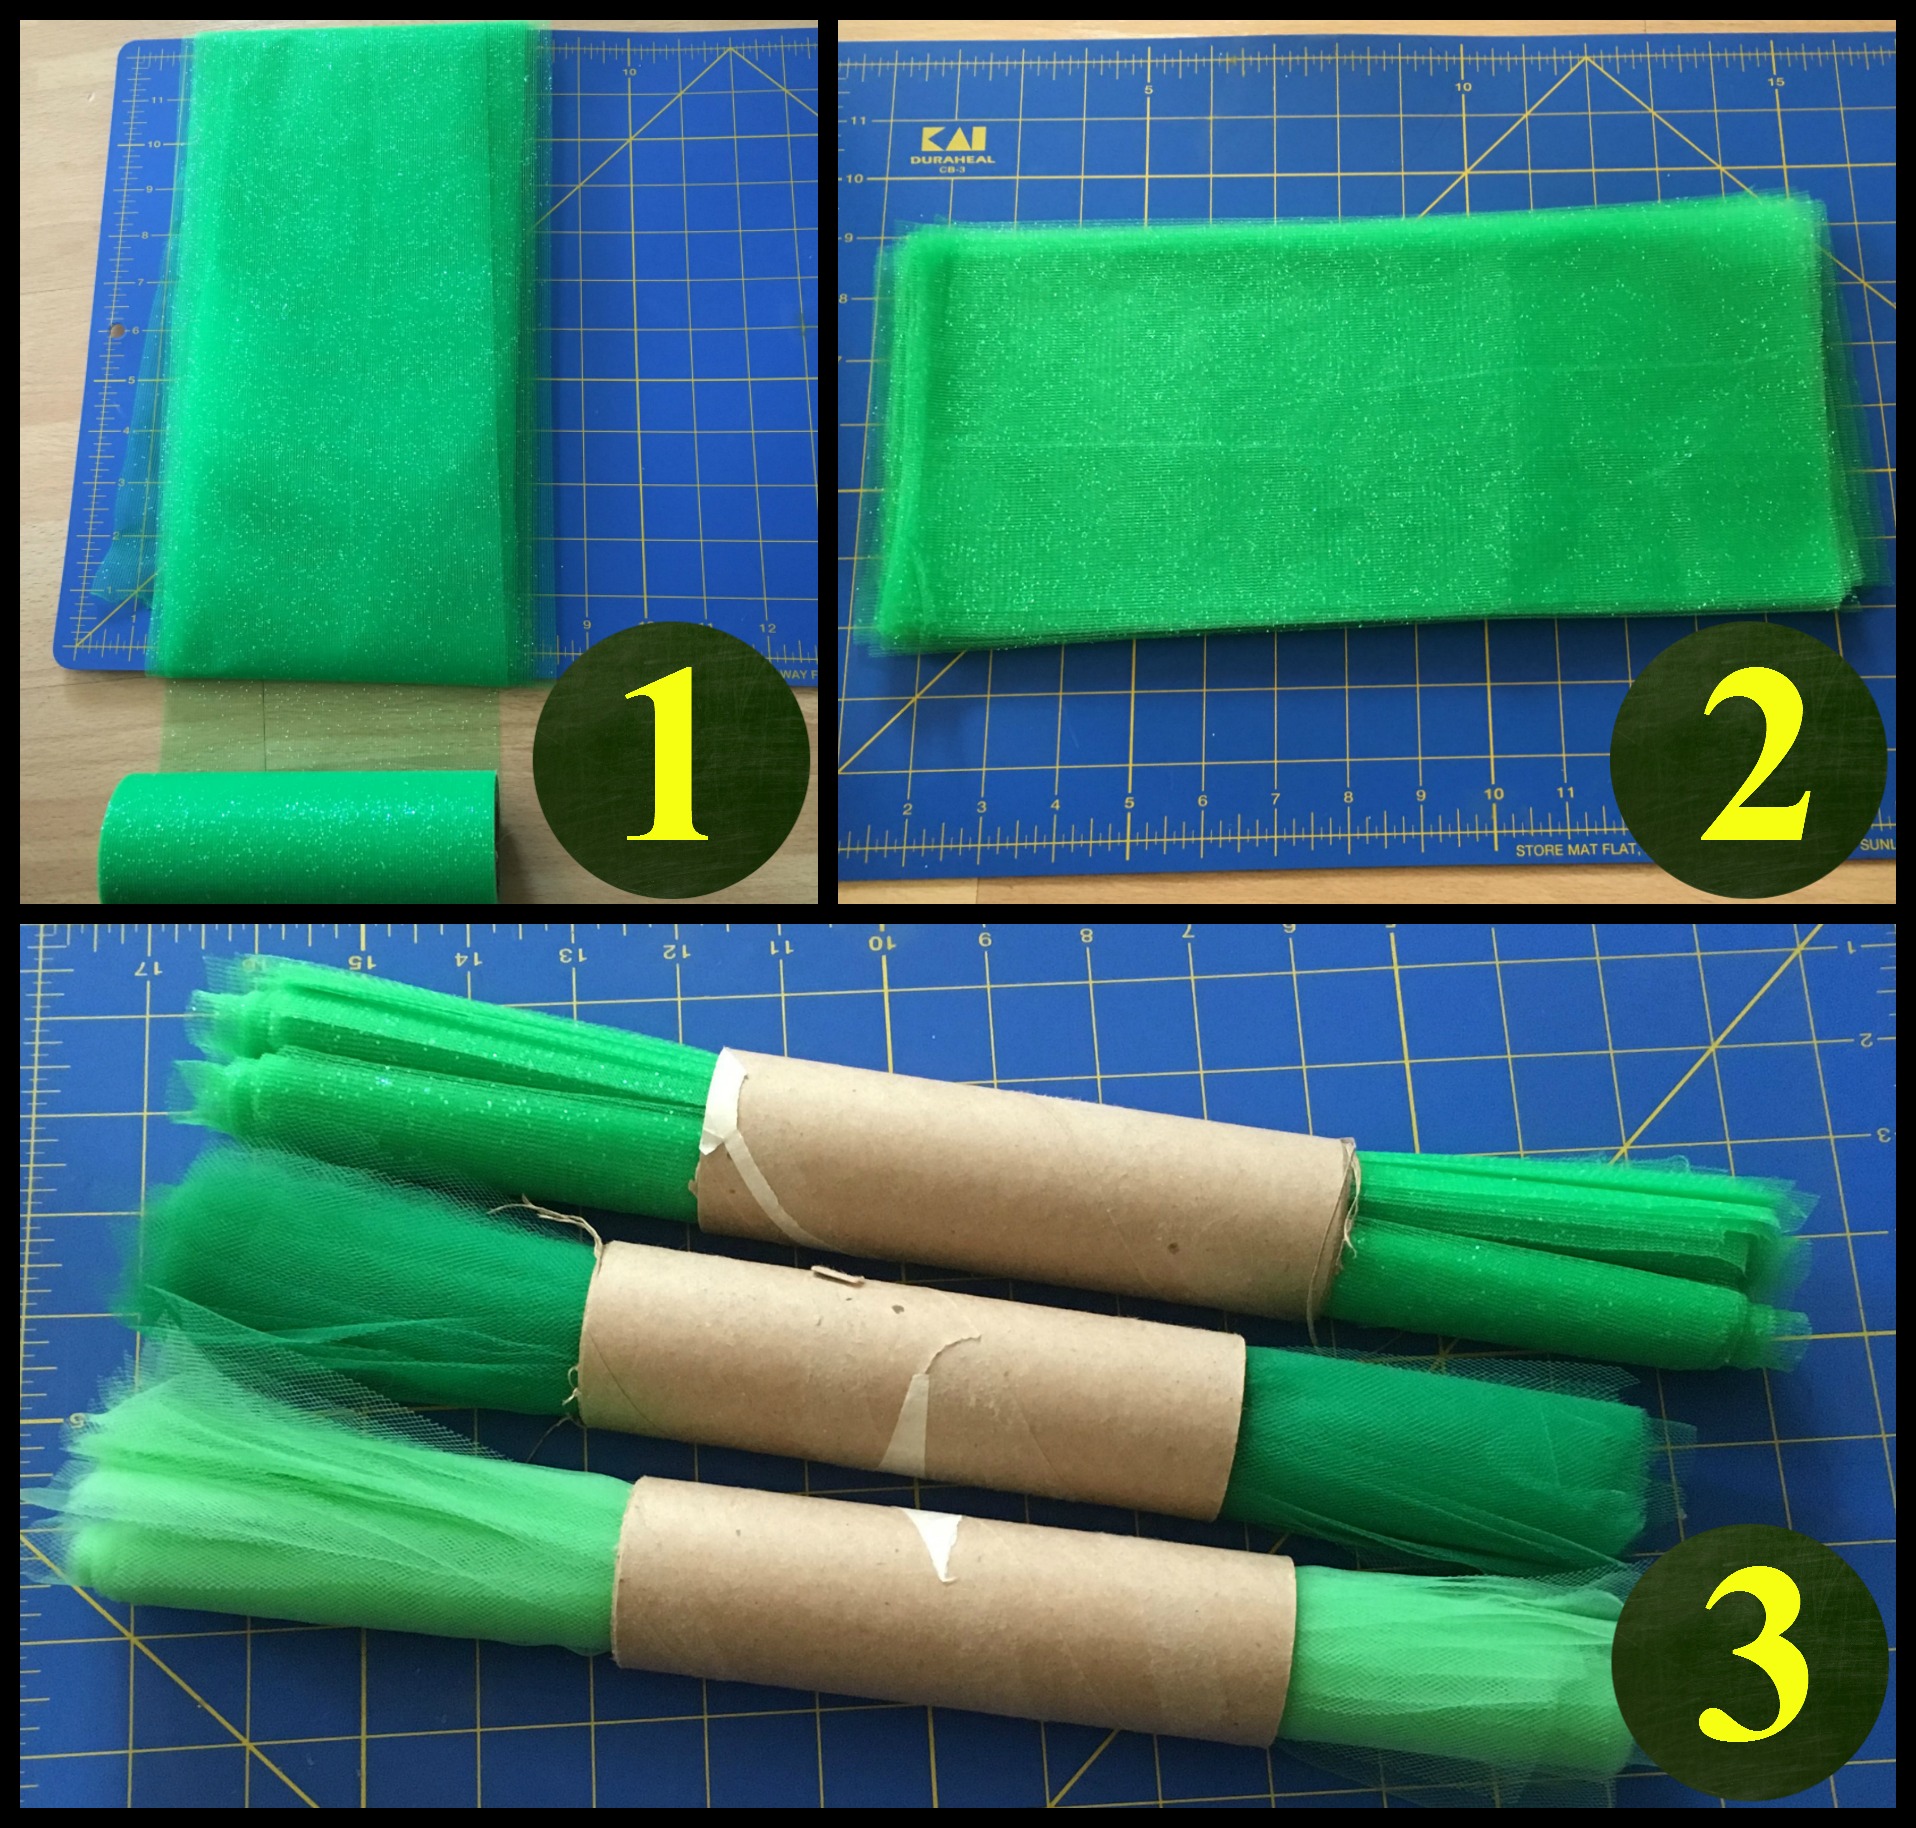
1. Since this is a dress for a girl 6-12 months old, I want the skirt to be about 14". I didn't have a box around, but I noticed my cutting board is 12" across the shorter side - plus a little less than a half inch around the grid's border. So, wrapping the tulle relatively loosely around the cutting board and cutting on both sides would give me just about the perfect length.
Given that there are about 42 holes around the 7" lined tutu top, I will need about 2 x 42 = 84 strips. We're only going to add 2 rows on this dress - don't want to drown the poor girl in tulle! Since I'm using three shades of green, that comes out to be about 28 strips per color - IF I were going to add equal amounts of all three. The glitter tulle is a little thicker than the 100% nylon tulle, so I will only add this one periodically, using the following pattern:
LKLKL-G-KLKLK-G-LKLKL-G-KLKLK-G...
Where L - Lime K - Kelly Green G - Glitter
Using this pattern, you'll need:
Glitter - 14 strips (7 times wrapped around the board, then cut on both ends)
Lime Green - 36 strips (18 full turns around the board, then cut on both ends)
Kelly Green - 34 strips (17 wraps of tulle around the board, then cut on both ends)
This pattern repeats 3.5 times, so you'll end up with one Glitter that has a Lime on both sides. Trust me, no one will notice, but just for grins and giggles, let's start at the back seam with the first Lime, that way the slight break in pattern is at the back of the dress.
2. As noted above, after wrapping the tulle around your chosen board, cut both ends so you end up with two stacks of tulle strips, measuring about 14" long.
3. I only have pockets of time in which to work on my projects, and those pockets often coincide with one of my kids' sports or band practices. I also work on my projects a bit at home and at work, so there's a good bit of traveling the pieces of these tutus enjoy before reaching their final state.
To help keep things together and organized, I have found that using the tulle spool centers as holders for my tulle strips when I'm not actively using them works great! For this tutu in particular, you can roll the tulle in the direction it naturally curls to help maintain that curl. This will make for rounder ends once the ribbon is sewn on.
You will not use an entire spool for this tutu if you're using multiple colors. The spools used here were left over from a previous project (Red Angry Bird Inspired Tutu Dress).
Step 2: Cutting the Ribbon Strips
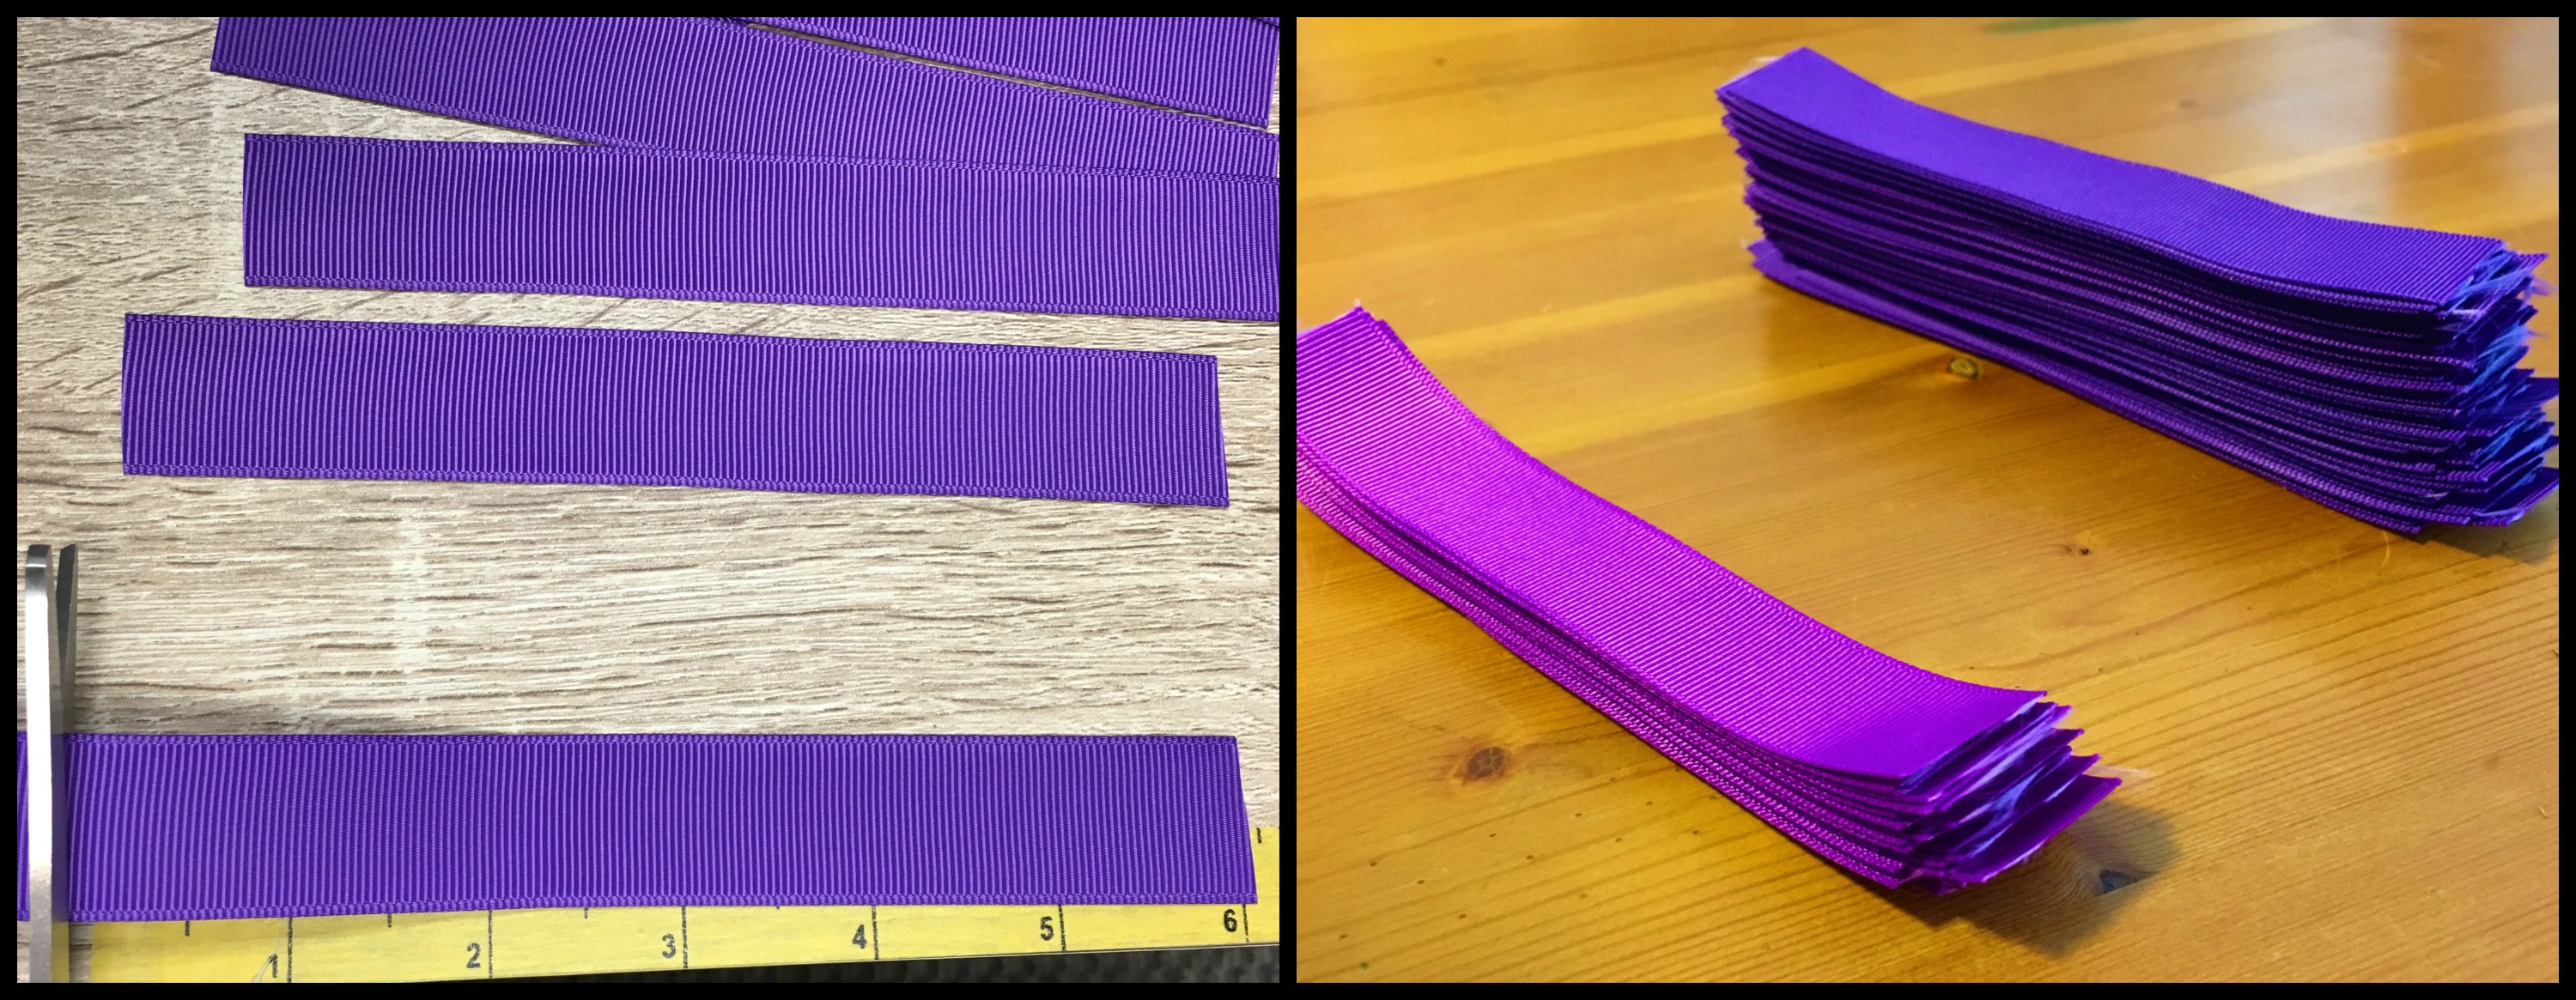
1. Cut 6 inch strips of 7/8" ribbon. You'll need twice as many pieces of ribbon as strips of tulle as you will sew one strip of ribbon on each end of the tulle.
For this dress, I cut 96 strips of Regal Purple to be sewn to the Kelly Green and Glitter Tulle (14+34 strips x 2 ends). 72 strips of Purple were cut to be sewn to the Lime Green Tulle (36 strips x 2 ends).
TIP: The nylon tulle stretches a little bit when sewing on the ribbon strips, so if your ribbon strips aren't exactly 6", but maybe stray a slight bit over, don't fret! Also, if you find your ribbon is a slight bit on the short side, bunch up the tulle just slightly here and there as you're sewing it to the ribbon. This will not be noticeable once the dress is assembled.
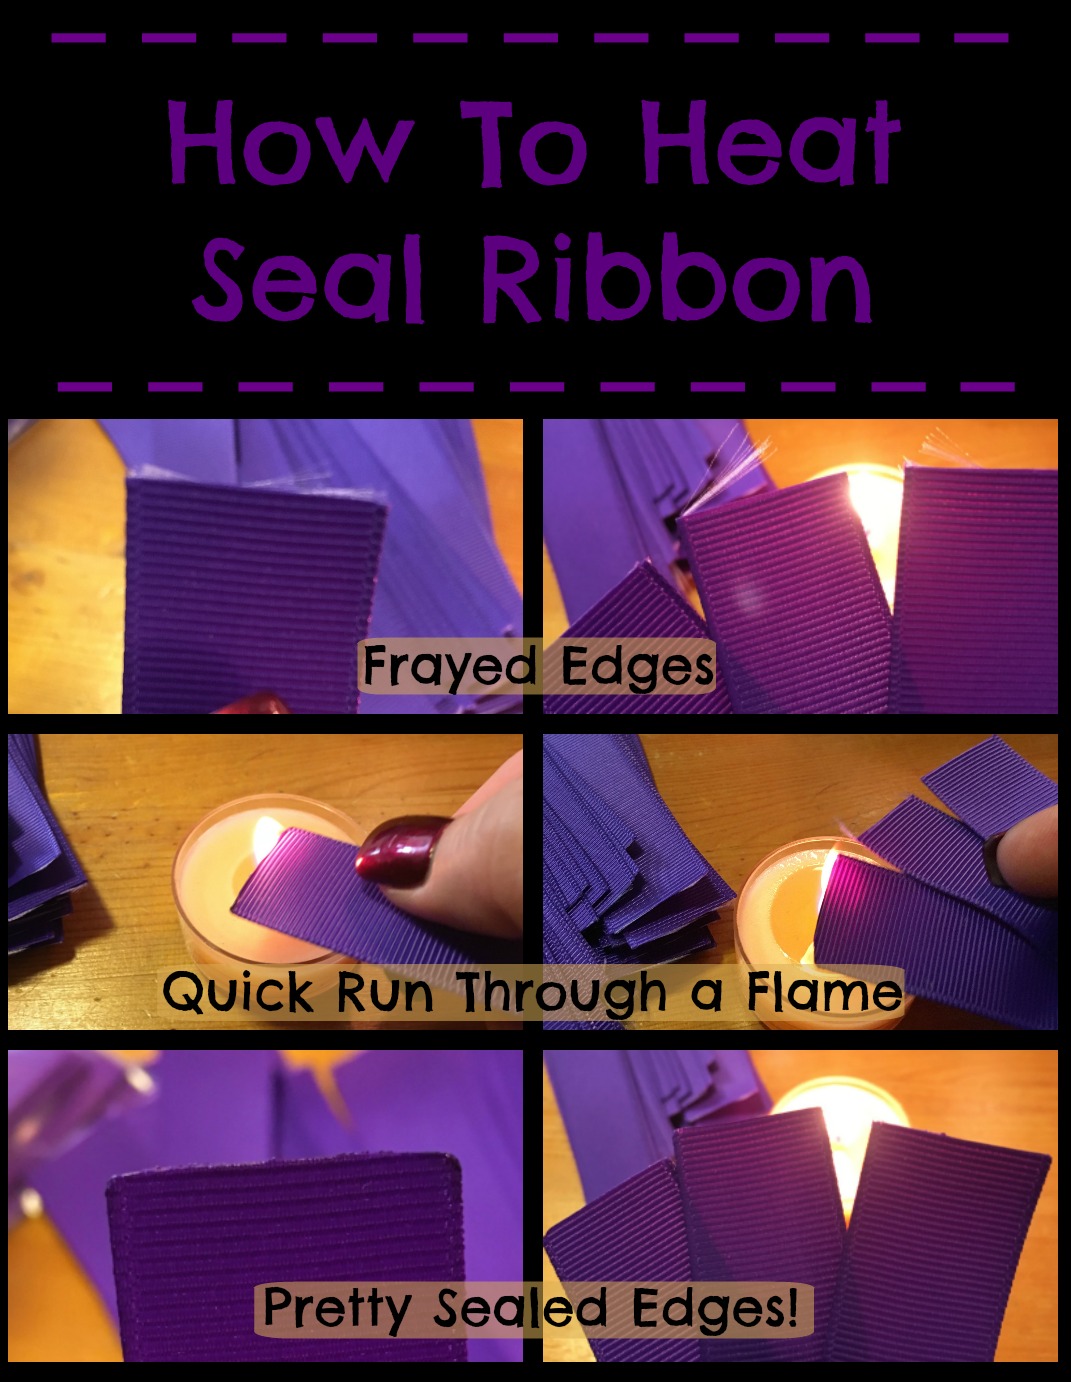
2. Be sure to seal the edges of the ribbon. You can see in the second image that the edges are not yet sealed. They will continue to fray if you do not.
I found the easiest way to seal many strips at once was to use a tea light and do three at a time. I ran one side of all of the ribbon strips, then the other sides. The ribbon only needs a quick second in the flame to do the job - any longer and it will scorch!
Step 3: Sew Ribbon Strips to Tulle Strips
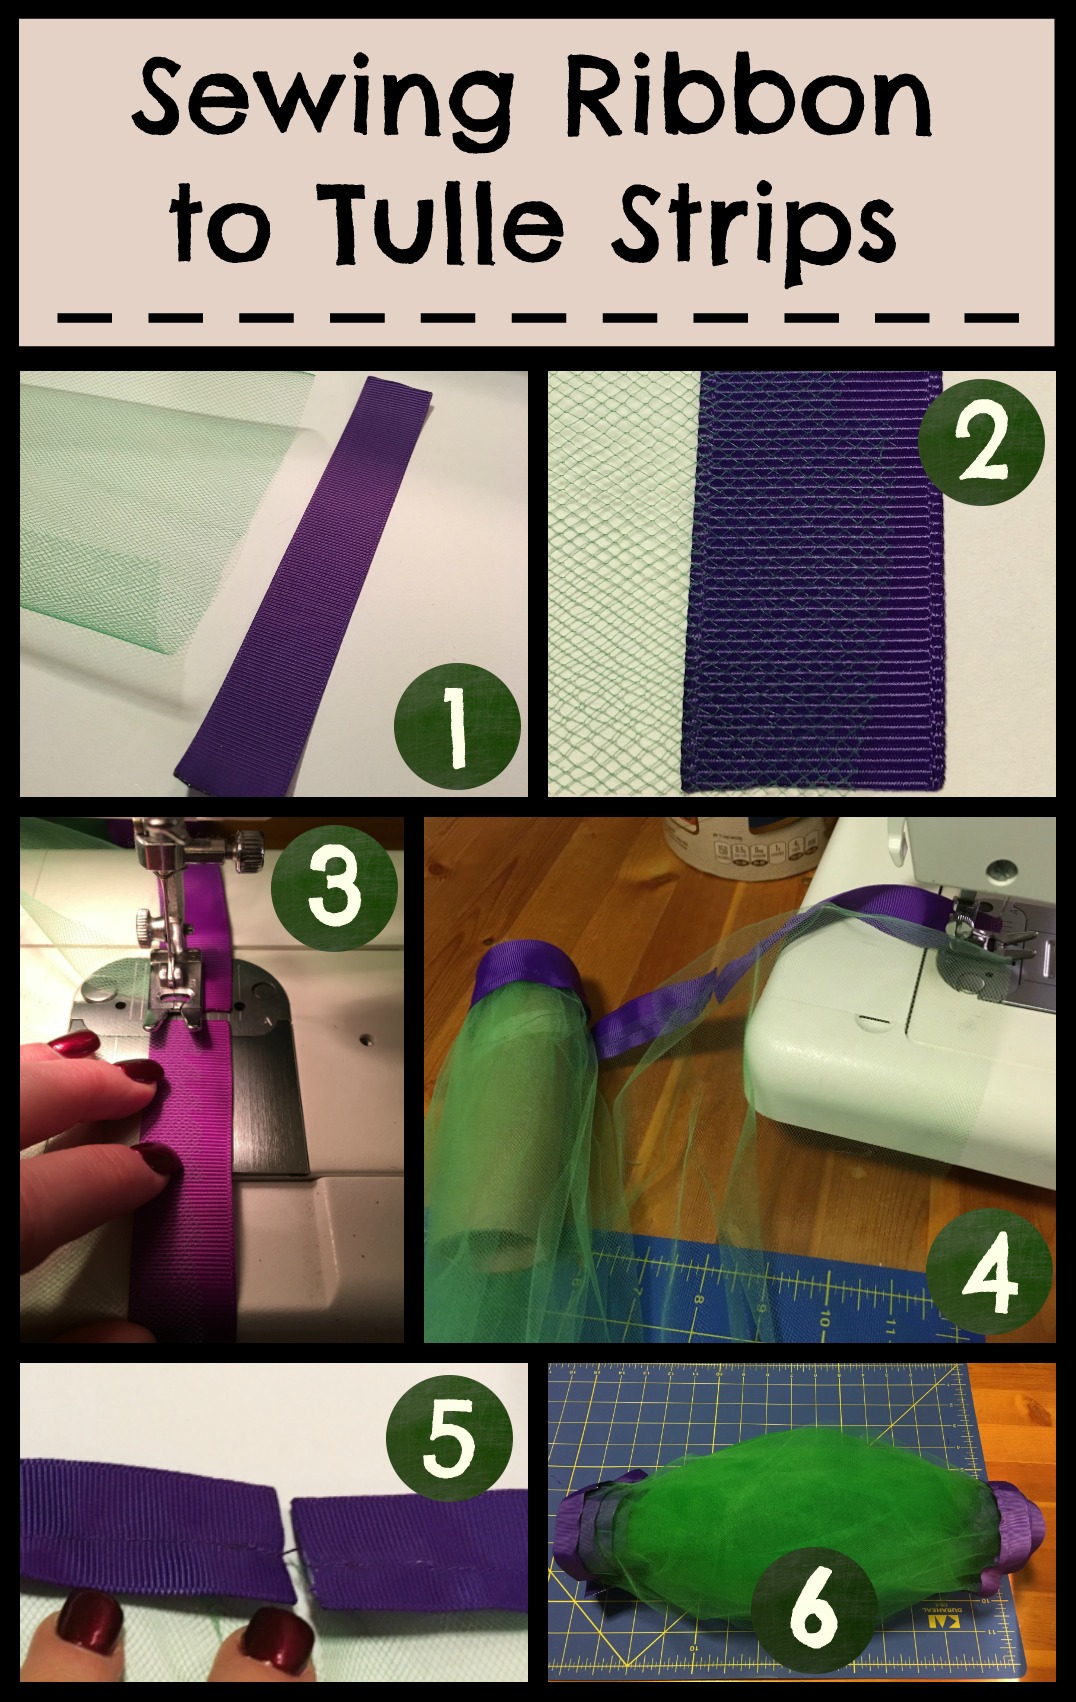 1. Pair up one ribbon and one piece of tulle, lining up the ribbon with the short end of the tulle strip (they should pretty much match up in length). They should both curl up at the edges - you want the curl to be the same way so they don't cancel one another after they're sewn.
2. Lay the edge of the tulle over the ribbon such that it covers about 2/3 or so of the ribbon. Don't worry if your tulle has uneven edges or if the resulting lengths of the tulle strips are slightly different in the end because of how much tulle was or wasn't overlapped with the ribbon. That's the magic of tutu dresses: the fluff disguises imperfections beautifully!
3. Sew the tulle to the ribbon along the left-hand edge of the ribbon as shown, away from the edge of the tulle. Tulle tends to stretch out a little during this process, so feel free to bunch a little here and there as you notice it doing so while you work down the length of the ribbon. It won't be noticeable if it's spread out here and there rather than one big bunch at the end.
I find it easier to sew the strips as one continuous piece with a slight space between, instead of cutting and resetting between each strip. This makes the process more like an assembly line and keeps all the pieces nice and tidy together.
4. I used one of the empty tulle rolls to keep the finished strips of tulle rolled and organized as they move off the back of the sewing machine. While the roll isn't necessarily needed to neatly roll the tulle up as you go, I liked how it worked for me. Just pause every 2-3 strips to quickly tidy up the pieces behind the sewing machine. This will also make it easier when you flip them around to go back the other way.
TIP: When rolling the first round, roll "inside-out" with the ribbon on the inside. This will allow you to have the tulle the correct direction as you're working back along the other side. When you sew the second piece of ribbon on the tulle strip, you can begin rolling those the "correct" way, with the ribbon on the outside.
5. Close up showing the space between strips. When it's time to tie the strips to the crochet tutu top, you'll simply snip the bit of string between strips.
6. After getting all the ribbon sewn on to one side of the tulle strips, flip them around and repeat the process to add a piece of tulle to the other end. The ribbon should be on the same side of the tulle such that if you lay the strip flat on your work surface, both pieces of ribbon are either facing up or both are facing down.
Step 4: Tie Tie Tie
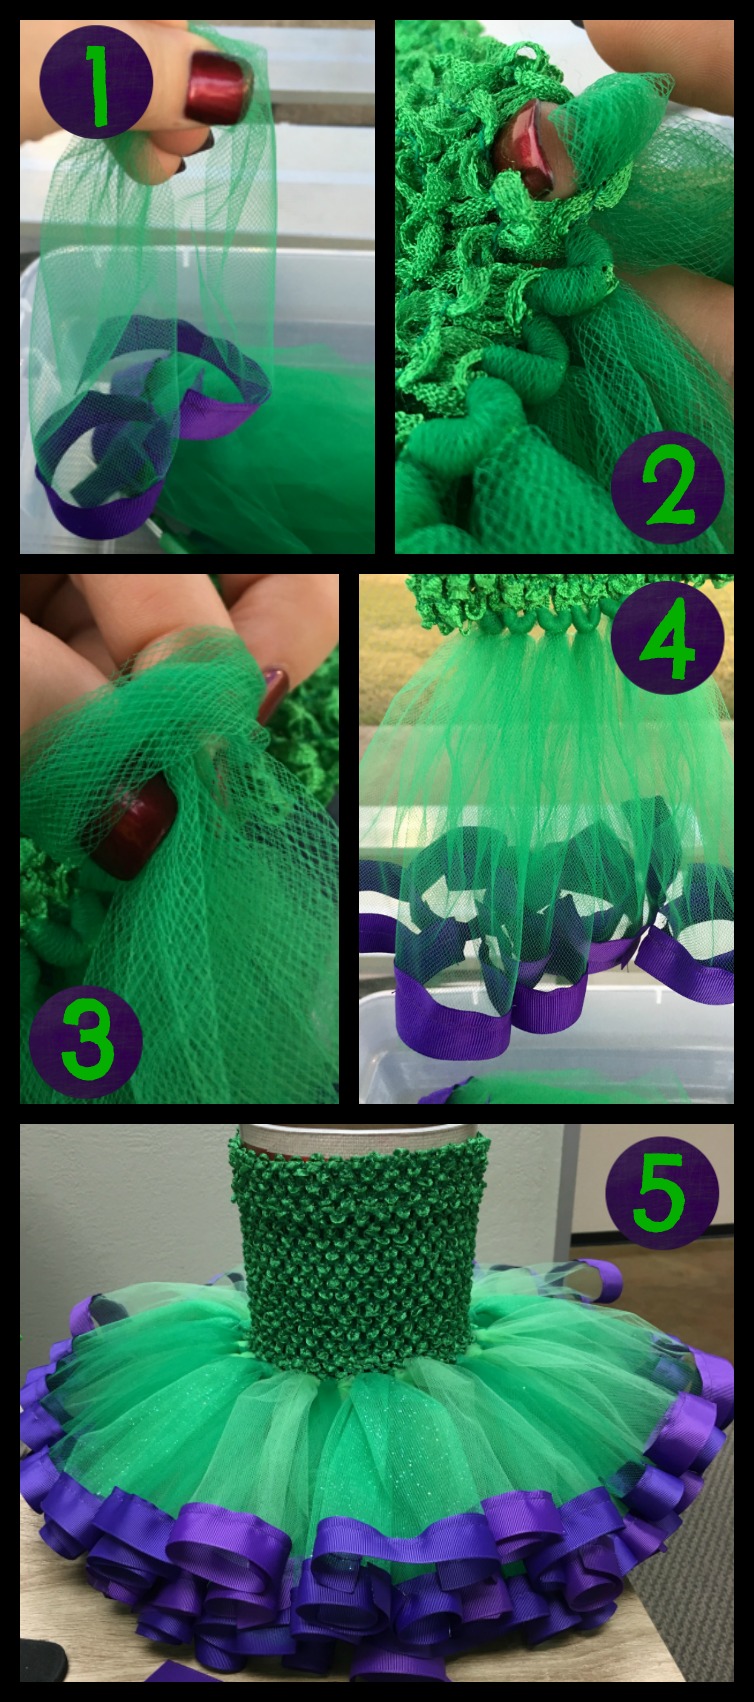
1. Your tulle strips should look like this (when detached from their mates) when you've sewn ribbon to both ends.
2. With the tulle folded in half, push the center through a hole on the edge row of your crochet tutu top. If you want the smooth edge of the knot on top, push through from outside to inside (opposite what is shown here). Since this is the under layer, and because I was at my son's baseball practice and forgot to bring my crochet hook, I went with the opposite direction just so I could make some easy progress. The top layer will be turned around the other way so it has nice, smooth knots on top.
3. Pull the tails through the resulting loop, ribbon and all. Tighten the knot without over pulling.
4. Continue around the row according to the pattern (if you're following the same pattern as I laid out above). It should start to look something like this.
5. Back at the office, here's what the dress looks like after all the ribbon edged tulle has been added to the crochet tutu top.
You'll notice that the final dress has a purple 1.5" crochet headband attached at the waist, while this one does not. In hindsight, it would have been more efficient to have that around the crochet tutu top and attach the second row of tulle to both the top and headband at the same time. If you did not do this, you can either pull the tails through the bottom row of holes on the headband to "attach" it to the dress, or use ribbon or tulle to thread through the holes above the knots to make a sash, tying a big bow in the back!
Step 5: Add Accents
1. Turtle Abs!
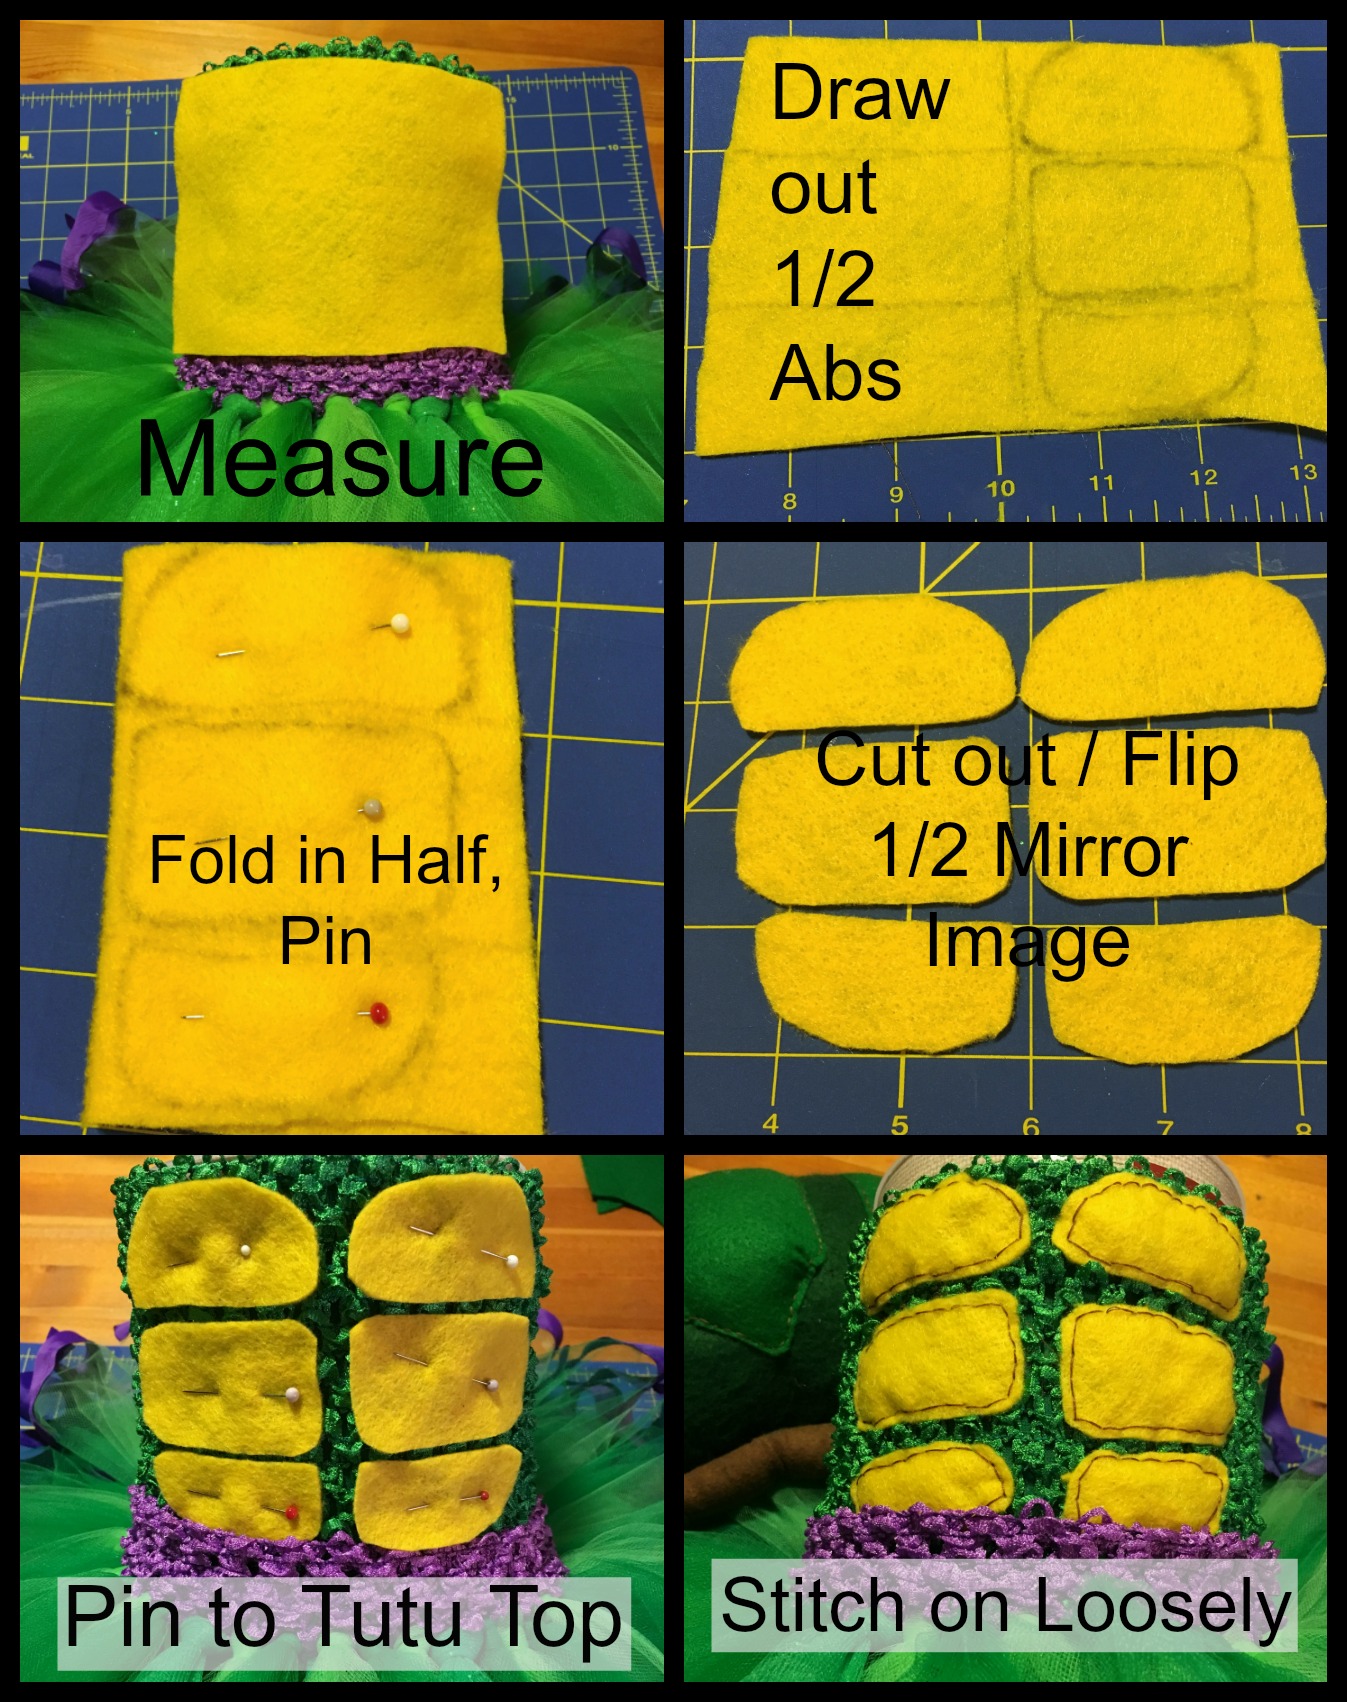
2. Shoulder Straps
Measure your subject for exact length, remembering to add enough to secure to the crochet tutu top on both sides. Otherwise, the measurement below worked for the model we used (~6mo).
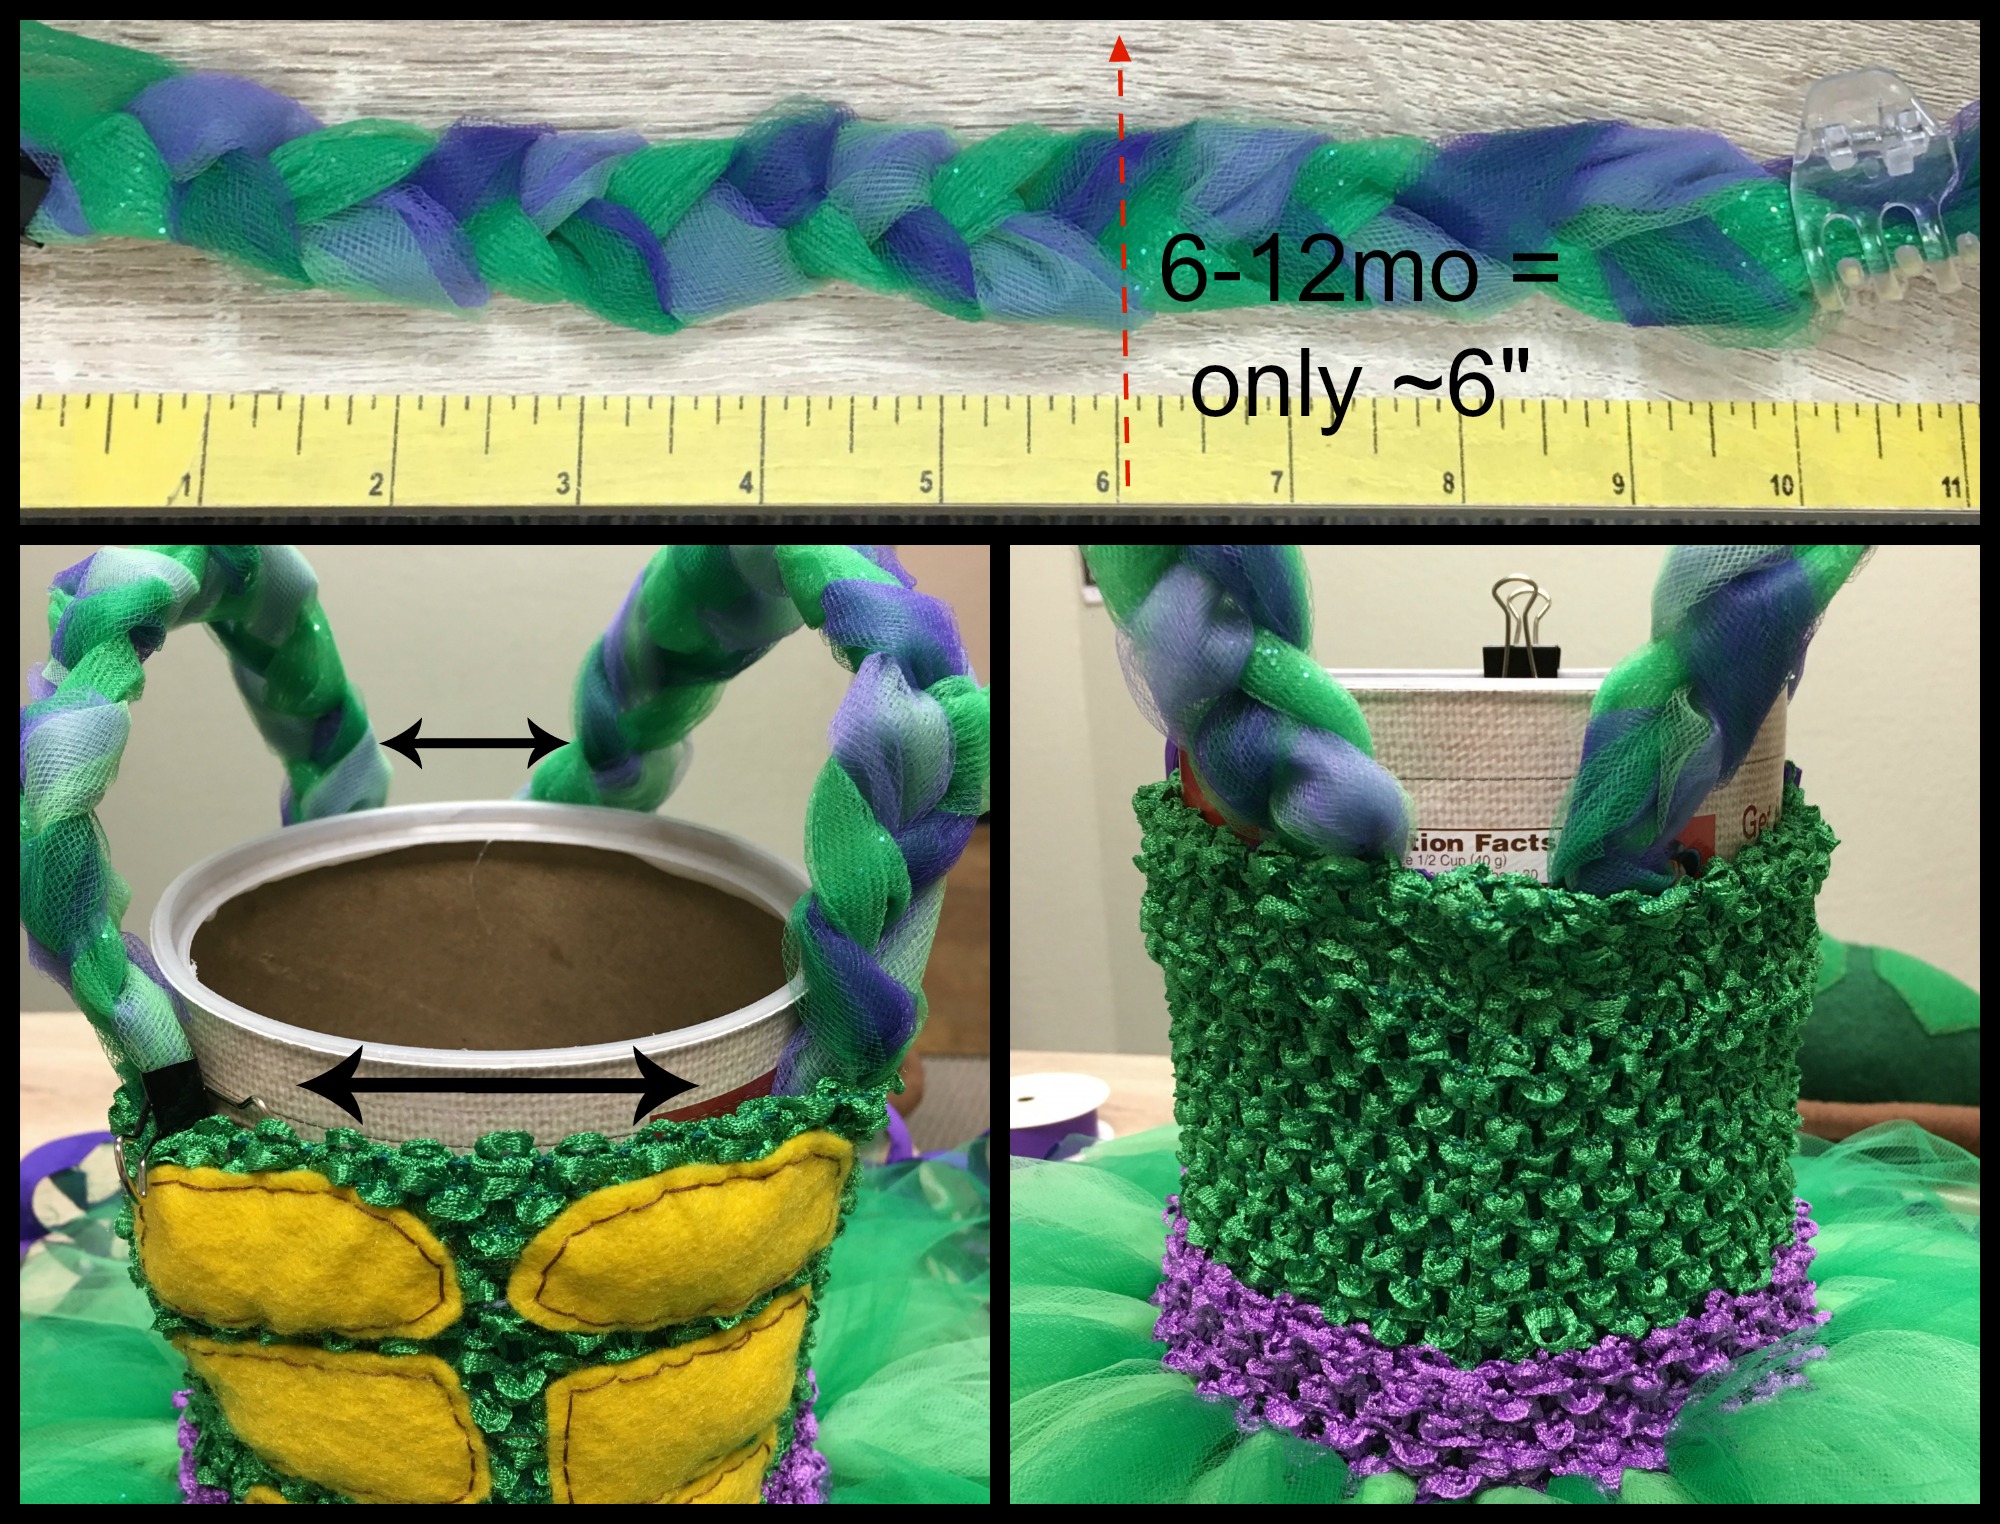
Incorporating purple tulle, and to balance out the thickness of the glitter tulle, the shoulder straps are made by braiding lime/lavender, kelly green/deep purple, and kelly green glitter tulle strands together. Make an effort to keep the purple tulle prominent on the top end of the braid, and keep it loose to give it a bit of stretch for comfort and to make a nice, full looking braid.
I generally prefer to have the straps closer together in the back than in the front as they are less likely to slide off little ones' shoulders.
3. Purple Bow Accents
Follow the steps below to create cute little tuxedo style bows to accent the shoulder straps.
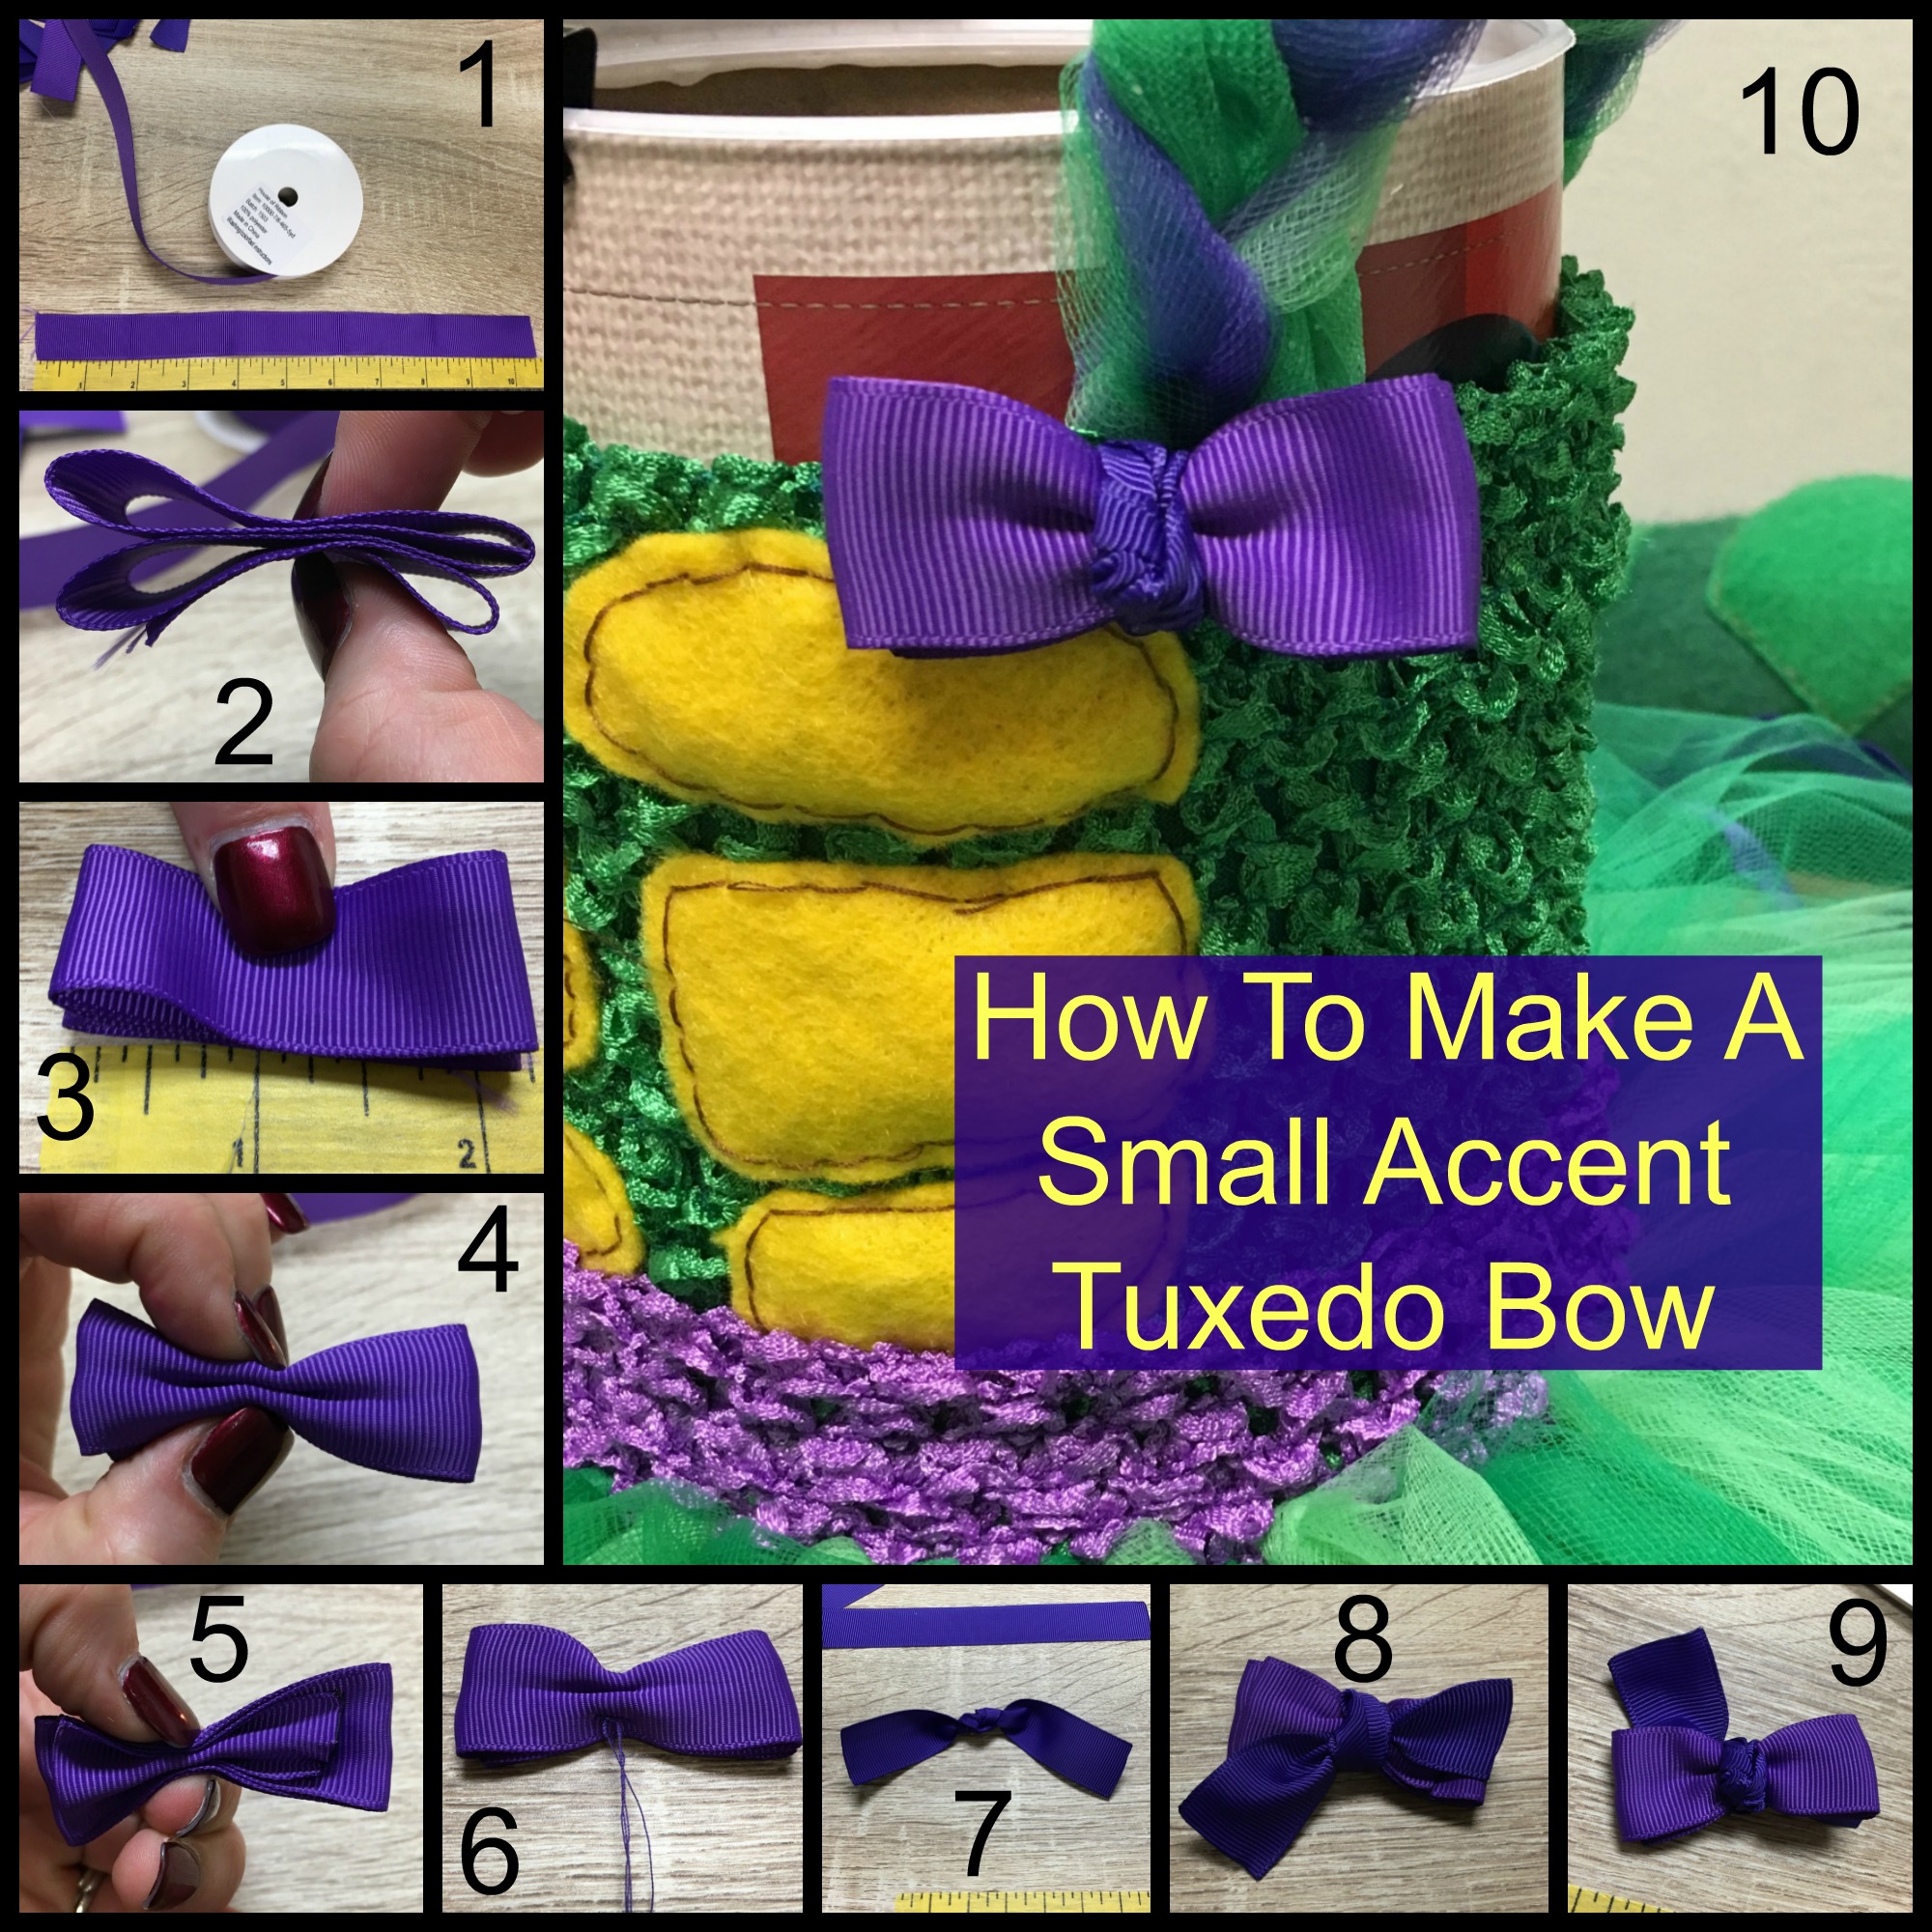
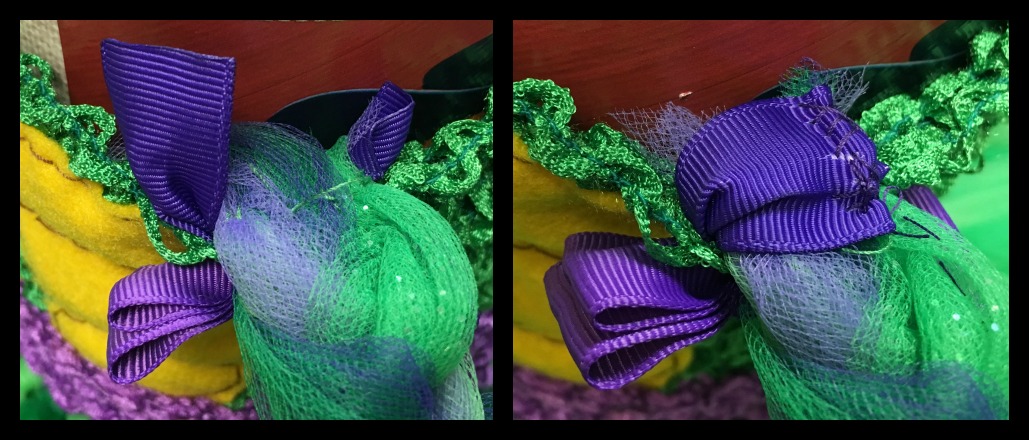
Attach one in front of each shoulder strap by bringing the tails of the knot ribbon (7/8) through holes in the crochet tutu top on either side of the strap and stitching in place. This also creates a smooth surface against her skin, rather than the uneven braided tulle.
TIP: Use scrap pieces of ribbon to create a patch over the braided tulle strap ends on the back of the dress to have the smooth surface in the back as well.
Step 6: Craft A Removable Turtle Shell
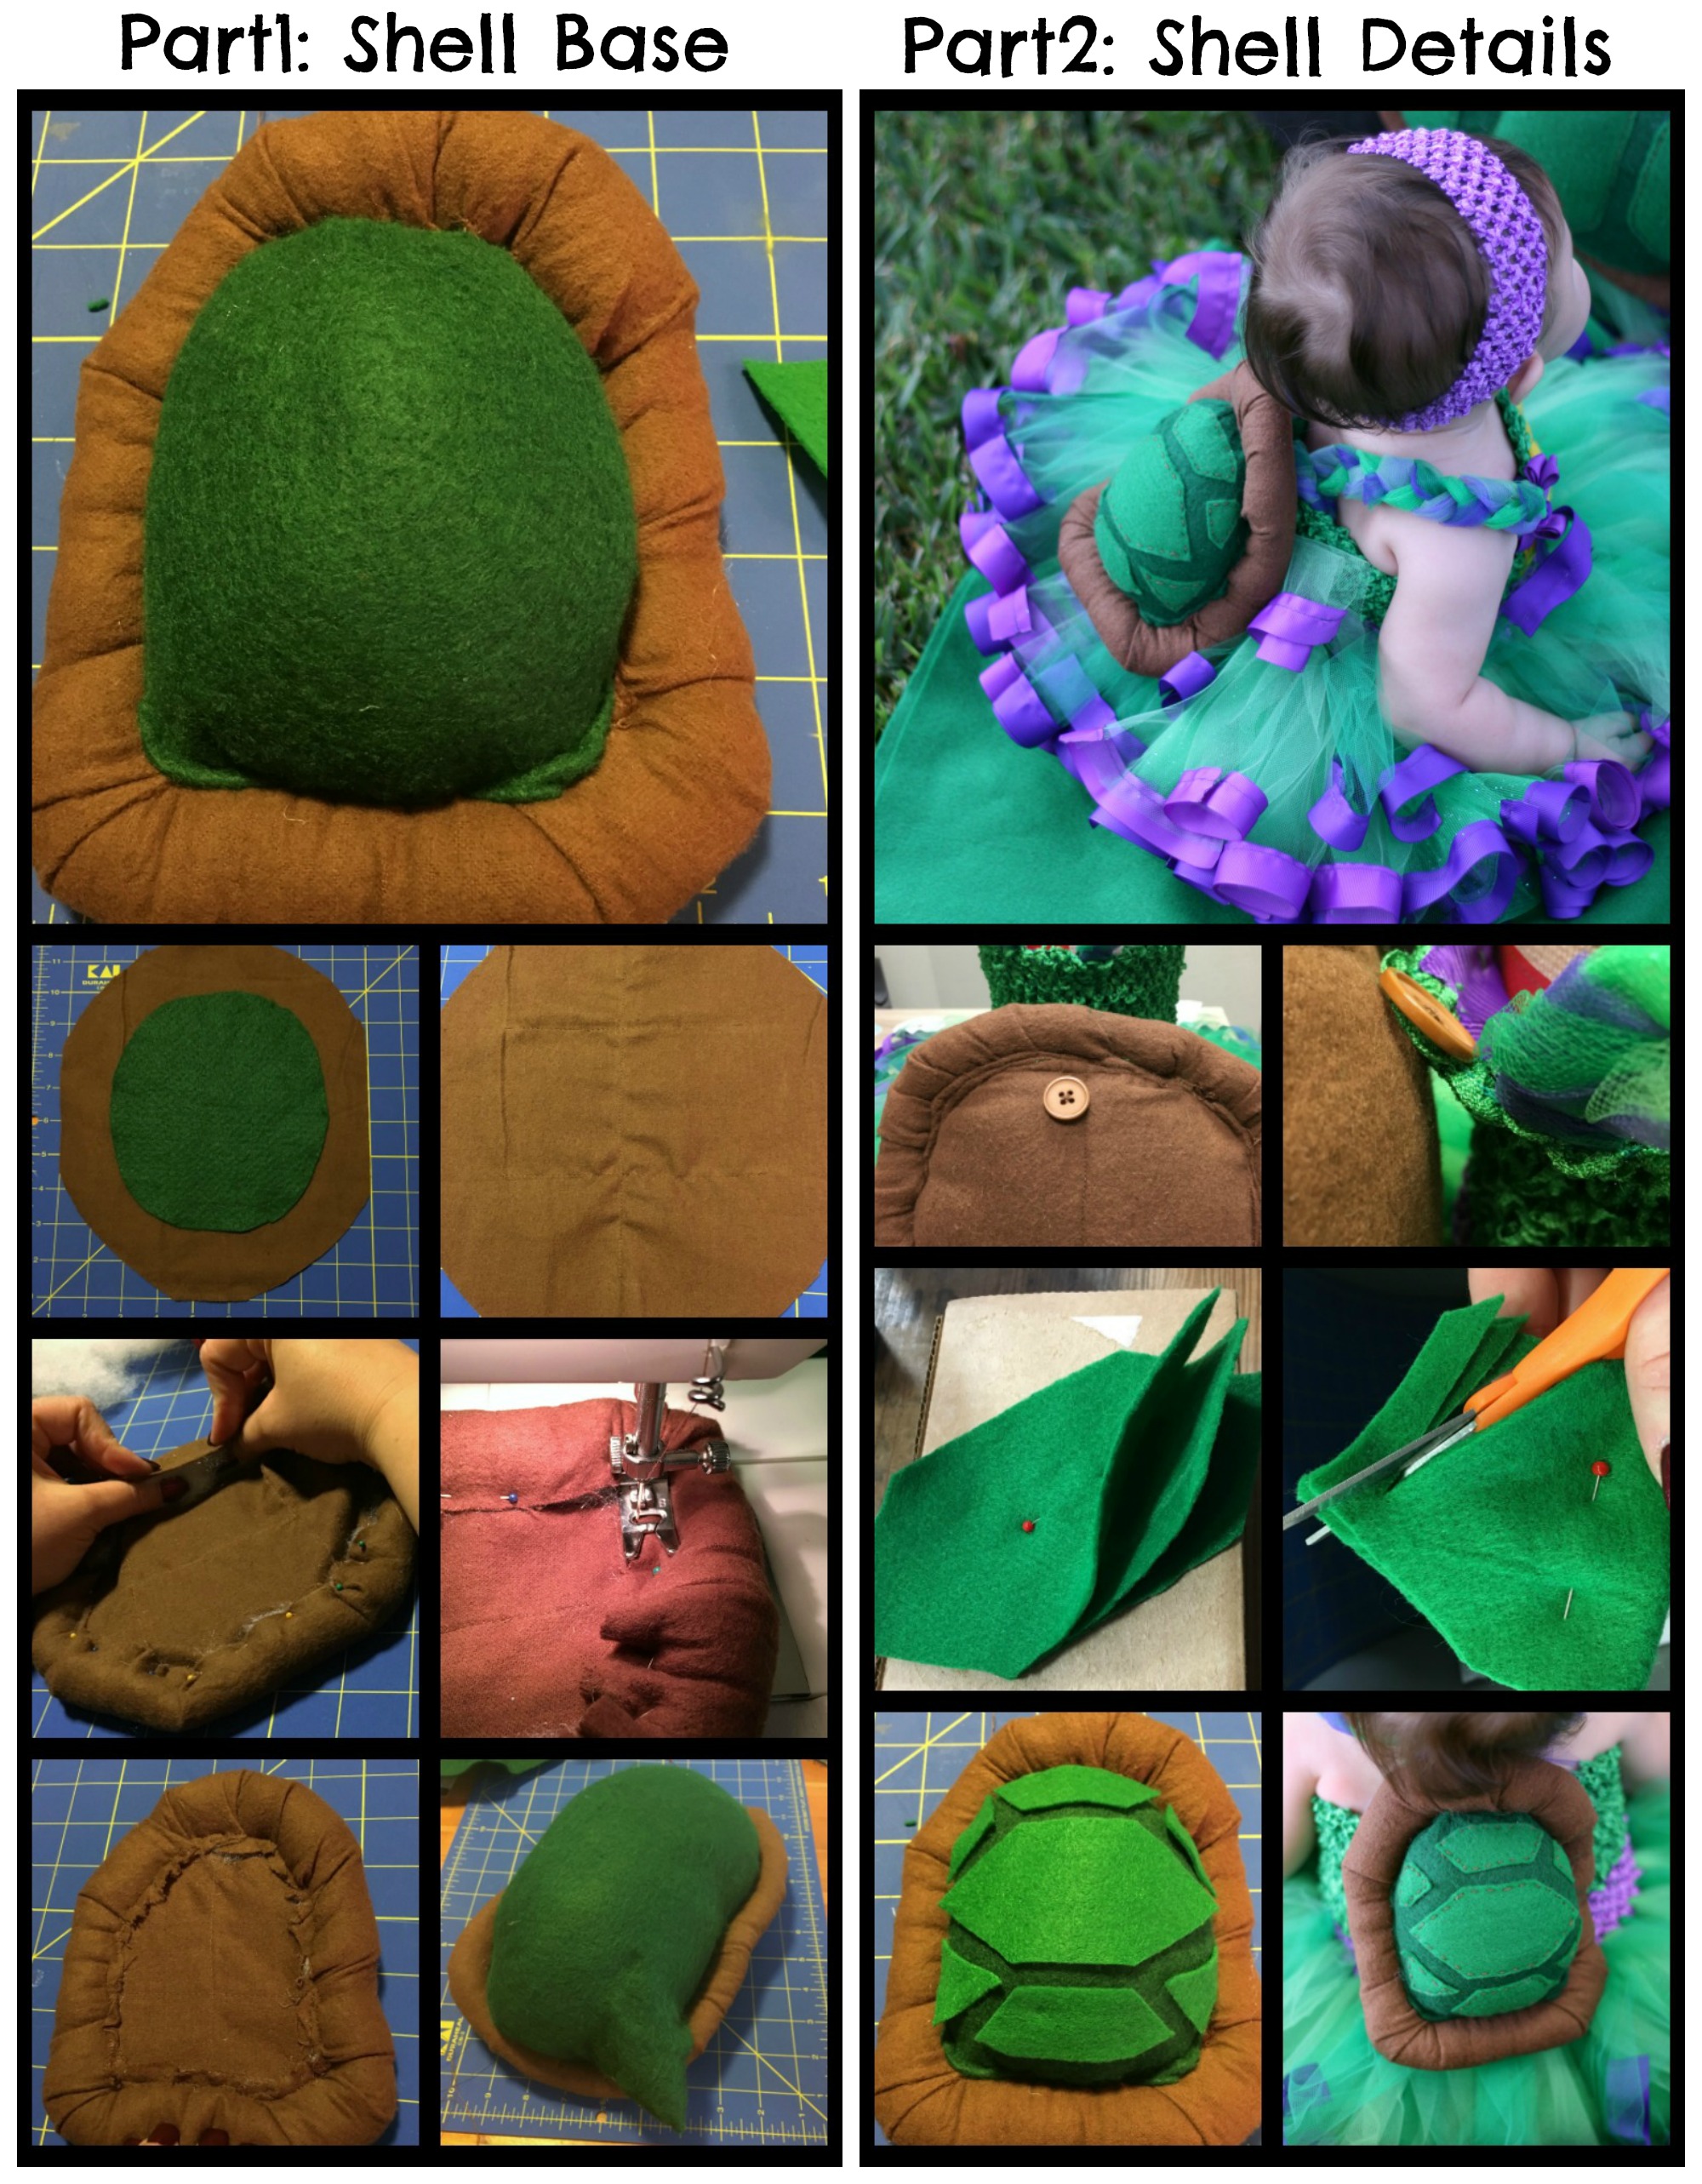
And THAT is how it's Done!
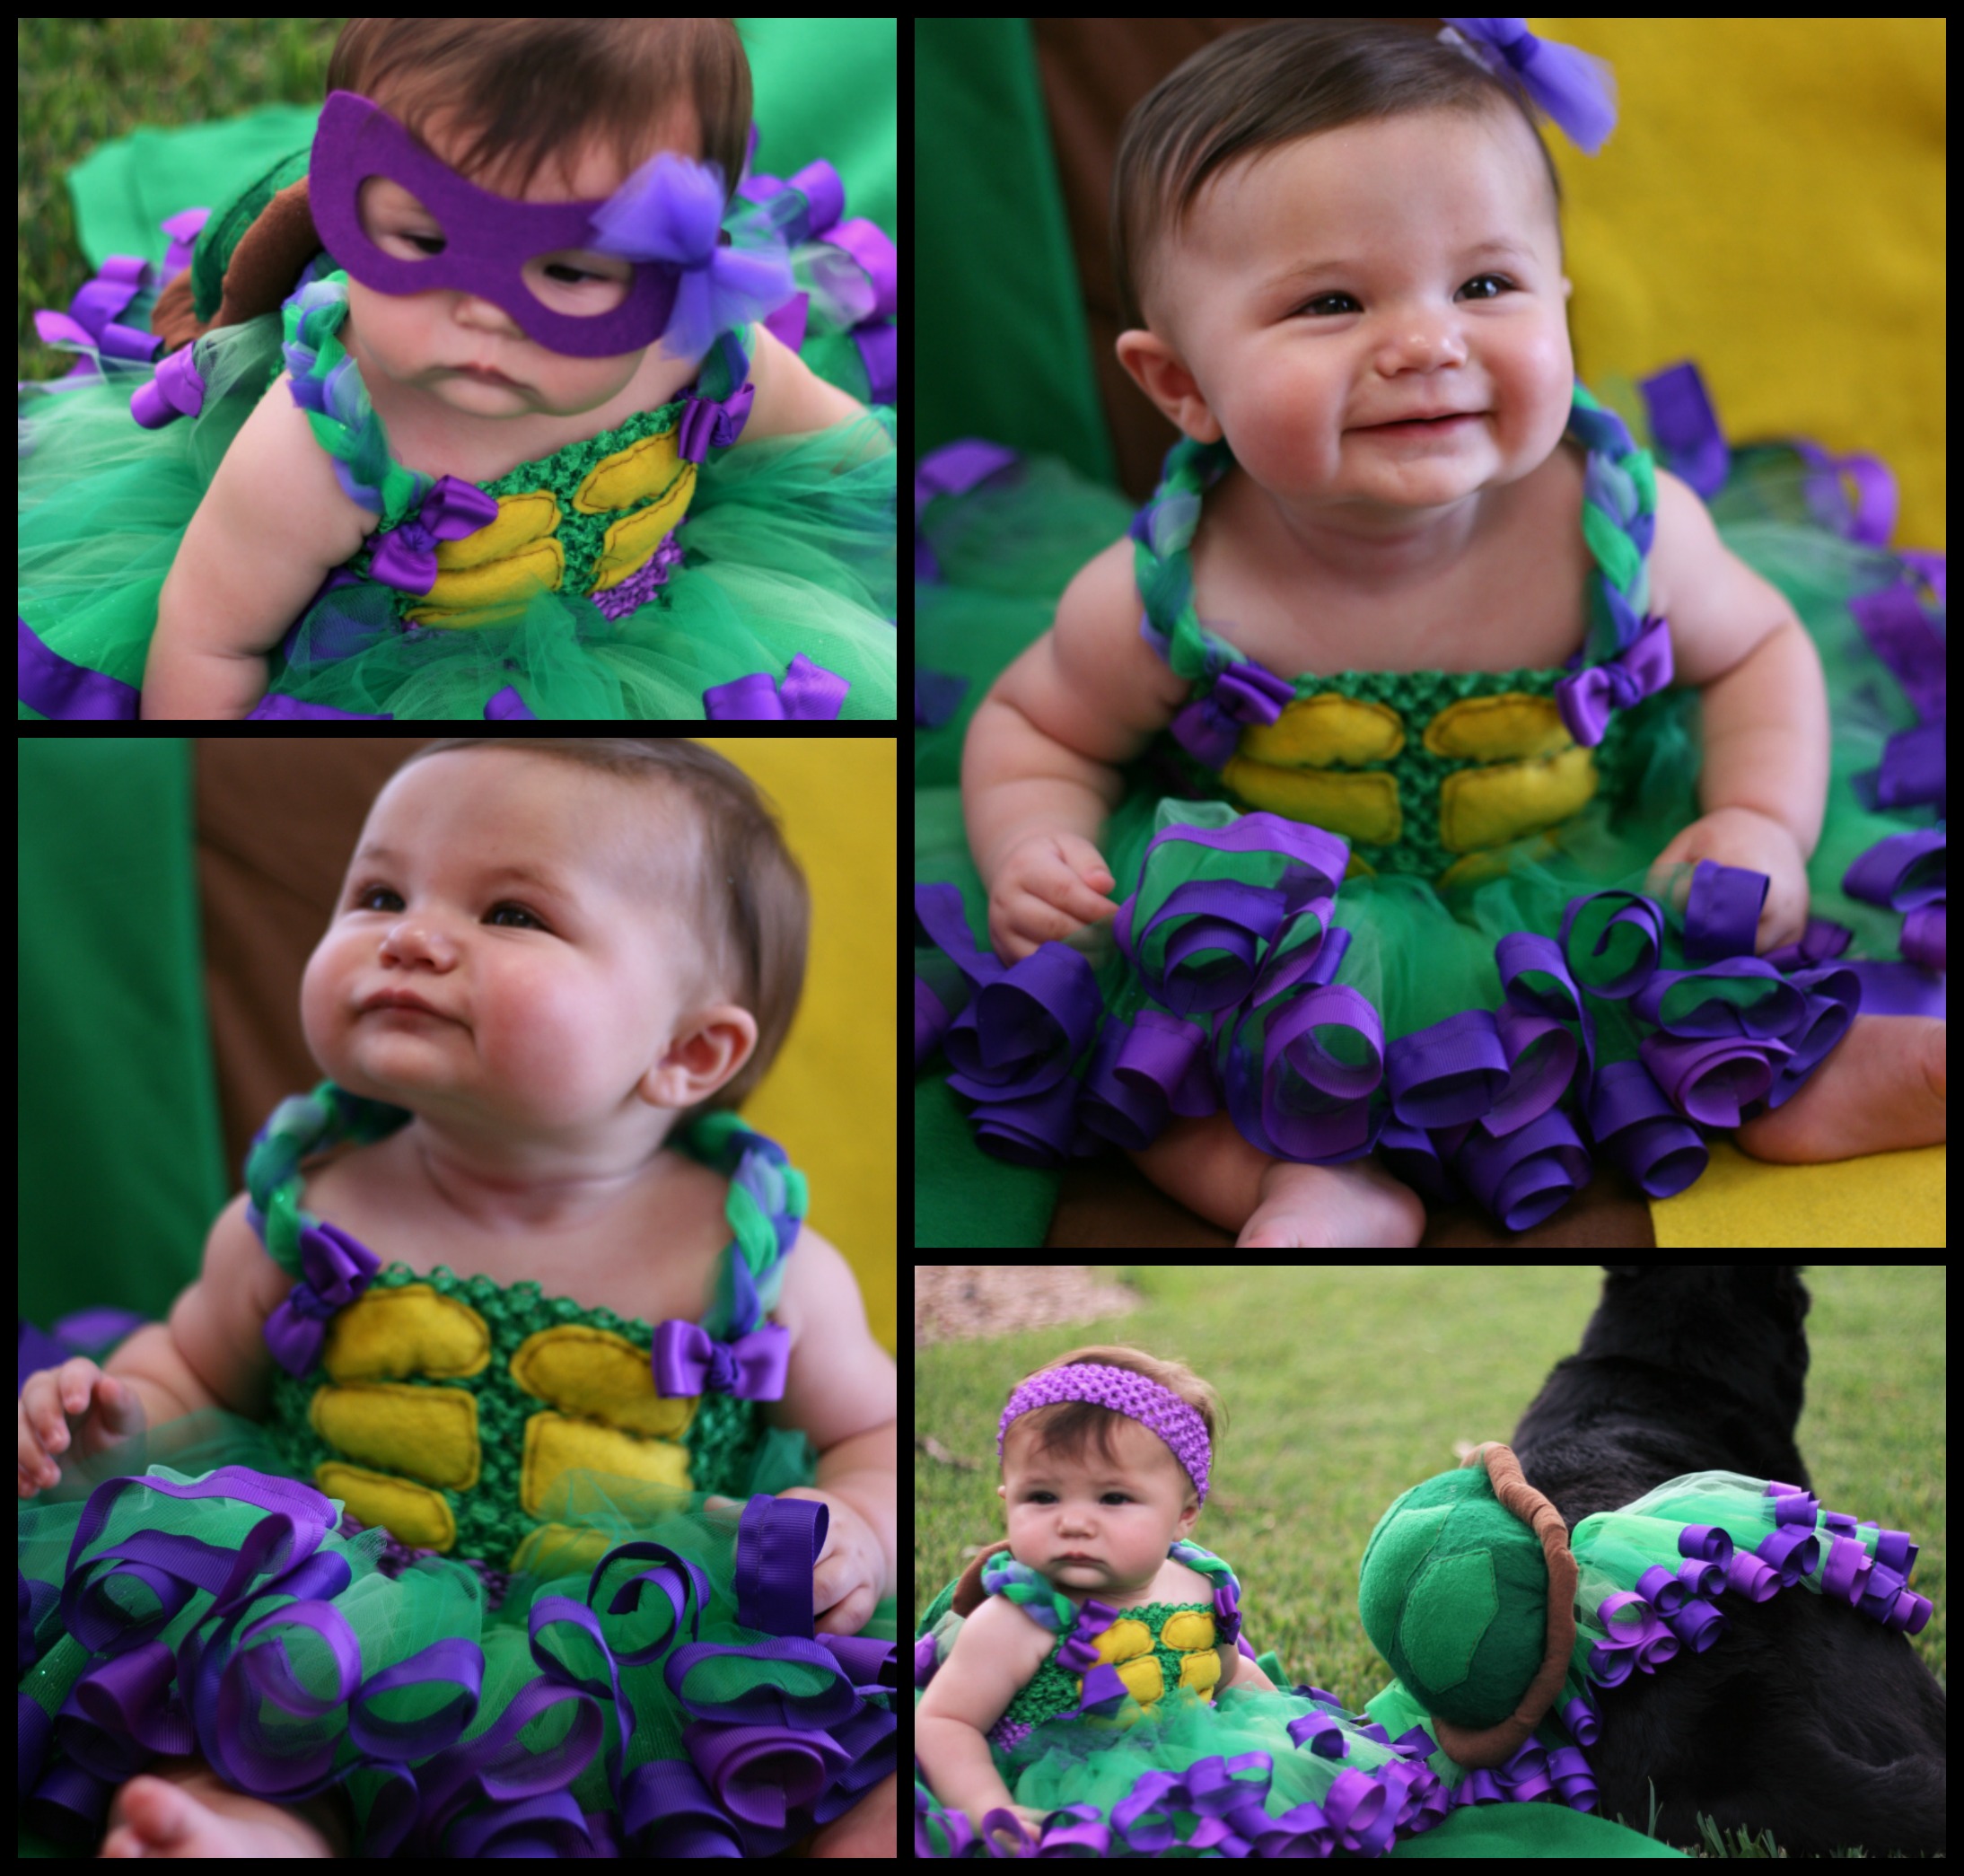
For those of you who have made it this far:
CONGRATULATIONS!
I know there were a lot of steps and details in this tutorial, but there are a lot of different techniques and parts to this costume. Hopefully you experienced that while there are several steps, once you get going each step runs by pretty quickly. And, the big bonus is that you will have gained experience with skills that can be applied to other projects!
Please be sure to post your questions, comments, photos, suggestions below and/or on our Facebook and Instagram pages. We LOVE seeing your craftiness in action, and are here to help you on your journey!
Remember ladies, details matter and can make the difference between a good costume or craft project and a GREAT one! Look for the little adjustments you can incorporate to make each project unique and special.
Thank you for spending time with us, and we certainly look forward to helping you with your next craft! Check back often for more tutorials and ideas!
Thank you Maggie & Charlie! (What a good sport Charlie was to wear a tutu and shell for us!)


