

Red Angry Bird Tutu Dress Tutorial | How To Make A Fluffy Short Skirt Tutu Dress
Posted by The Hair Bow Co. on Sep 8th 2016

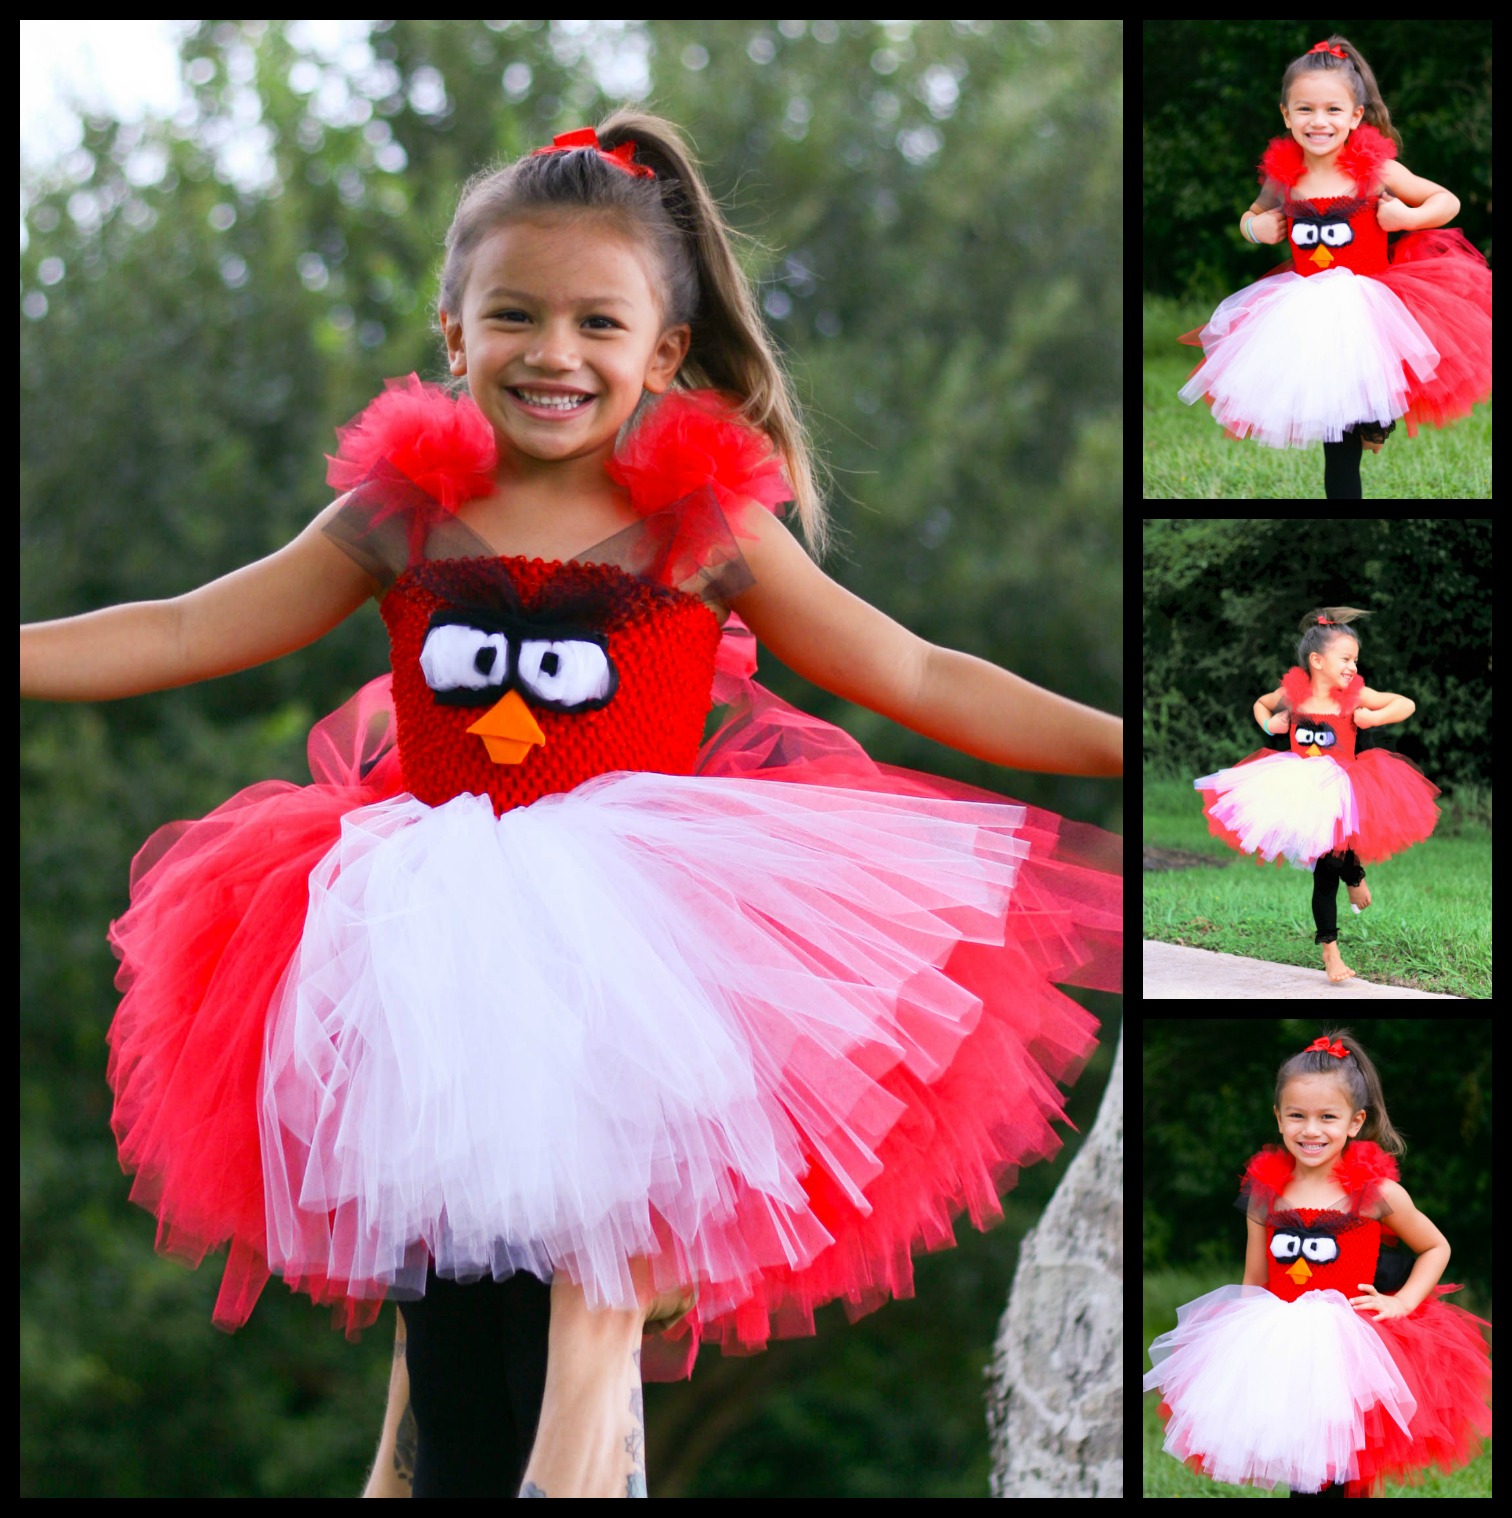
We've all played the game at one point or another, and now there's a movie available for all to see. You can't help but love the Angry Birds! We thought it would be fun to make a Red Bird costume tutu dress, with the added challenge of using only materials available in our warehouse. This means no felt cutouts for the face! GASP!
Please bear with me as I take you through the steps to make this dress. You may notice tulle attached in places I haven't covered yet in the instructions, but do not fret! As with most new projects, we have those "Ah-ha!" moments when we realize that perhaps things would have made more sense if we had completed Step D before Step C. I've tried to lay this tutorial out in the way that makes sense to me after having had the perspective of completing the whole process. Just roll with it and trust I've got you covered!
And remember, you are making YOUR tutu dress using this tutorial as mere inspiration. Make it your own, tweak the process as it makes the most sense for your needs, resources, and preferences. I only ask that you be sure to post your creations on our Facebook and Instagram pages, along with tips, questions, and suggestions, so we may all learn from one another!
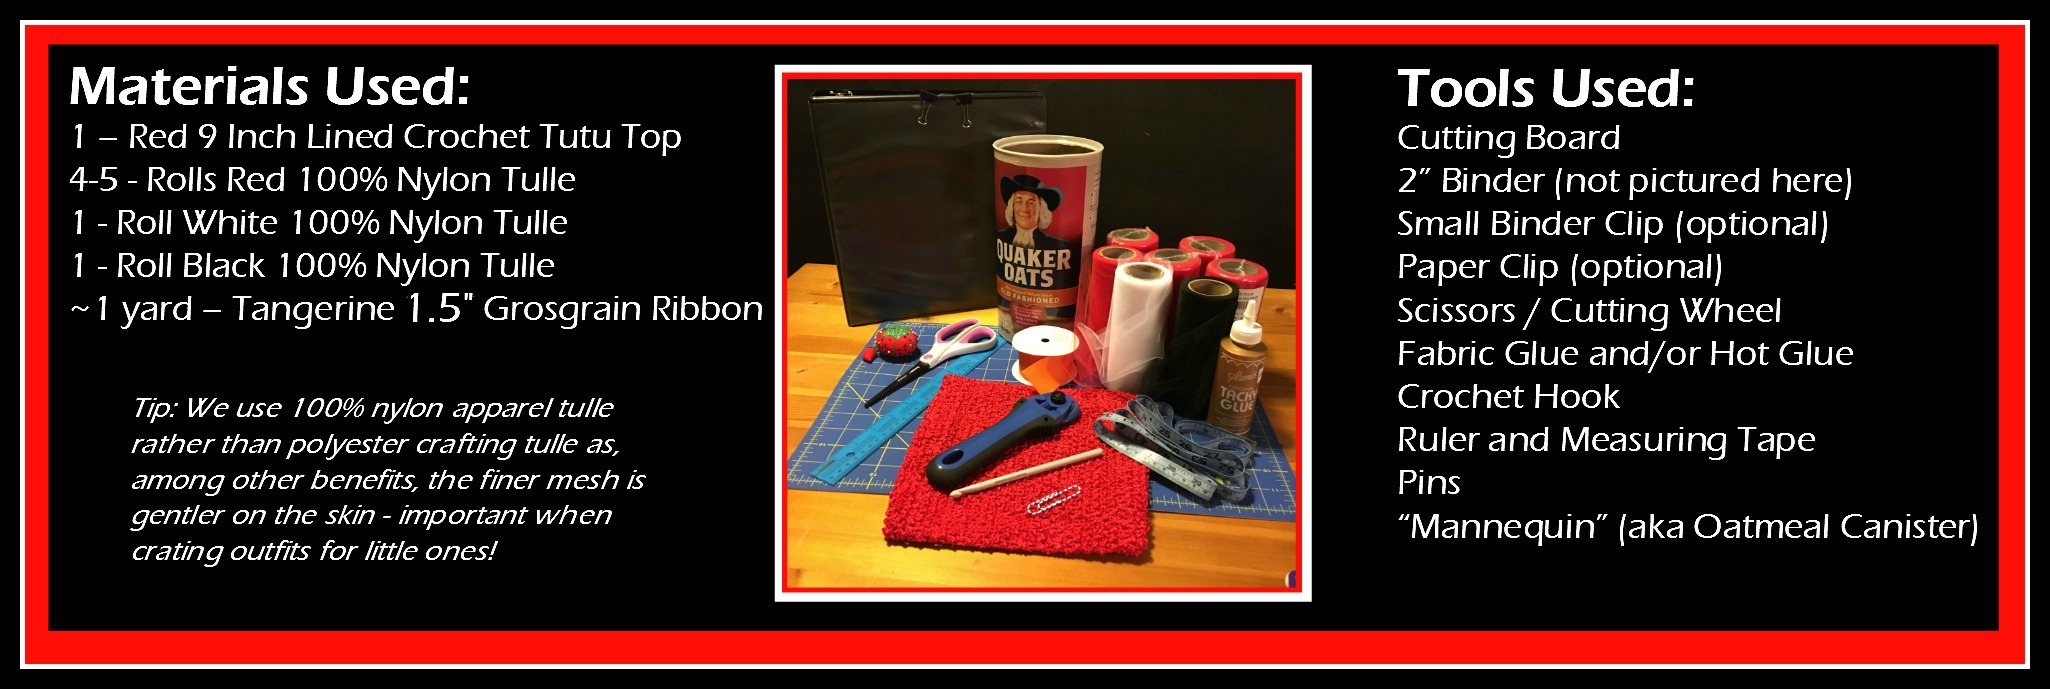
So, let's start at the beginning. Here are the supplies you'll need for making a dress for a girl 4-6 years old:
SUPPLIES
.
STEP 1: Cut the Strips of Tulle for the Skirt
There are many different methods out there for measuring out and cutting the tulle strips needed for your tutu dress. The generally accepted method around here is to wrap the tulle around a box and cut from there. This works GREAT... if you happen to have a box around that can be made to be the right size. I did not have such a box at the time I was cutting the tulle, so I looked around and spotted a 2" 3-ring binder that happened to be near me. I measured around it, and it was right at about 25", which in tutu dress terms translates to about a 12" skirt (12x2+1), which worked for me! We have done a good number of longer dresses, and I wanted this to be a shorter, fluffy tutu to have more of the rounded Angry Bird look. Here are the steps for using "The Binder Method":
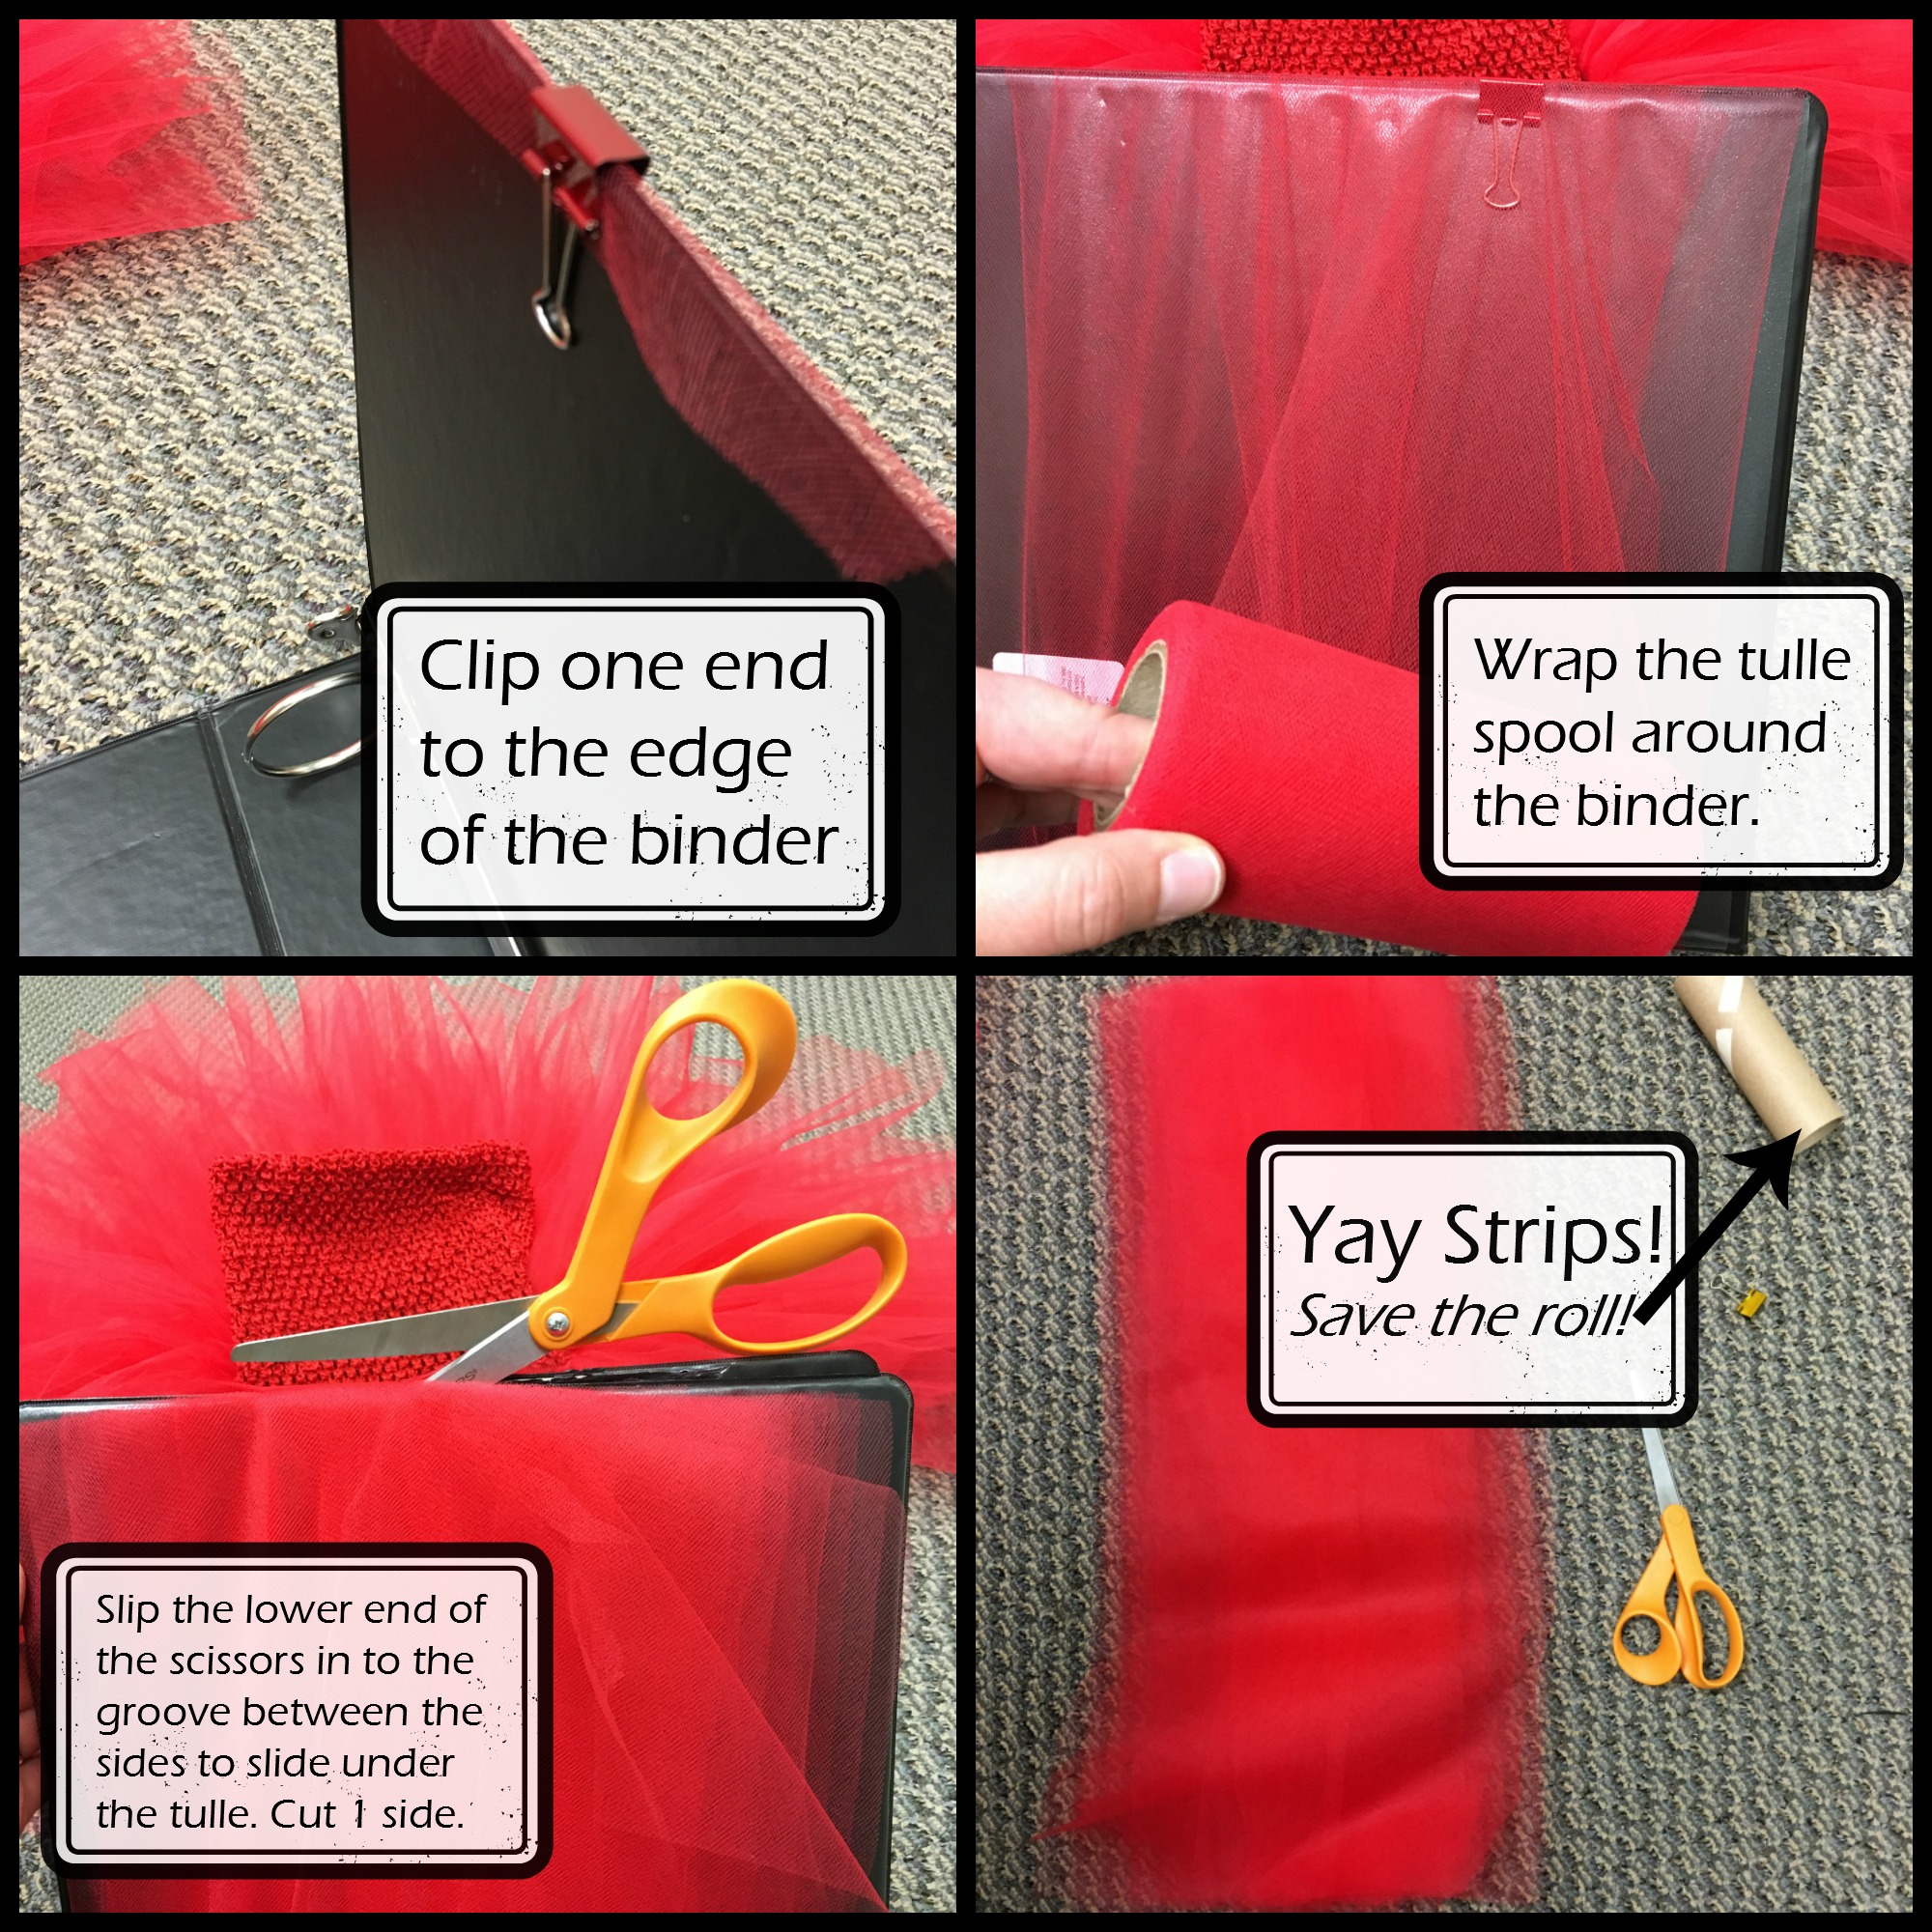
You may choose to cut all the strips at once, or just prepare a roll at a time. I opted for the latter, both to have a bit more control over the number of floaty tulle strips I had to keep track of, and also to be sure I didn't cut way more tulle than was actually needed. This skirt has 3 layers to make it really stand out, so it uses a good bit of tulle (42 holes x 3 rows = 126 strips of Red tulle; 12 holes x 3 rows = 36 strips of White tulle).
TIP: If you want to get the white portion set first, wrap and cut the white spool of tulle first. I marked off where I wanted the white to be, then started with the red. (I was impatient to see how fluffy the skirt would turn out!)
TIP: Save the roll and use it to hold your strips of tulle. Slide the tulle through the end of the roll as you would a napkin through a napkin ring. Then you pull out one strip at a time as you work your way around the crochet top. No more runaway tulle! This also makes it easy to bring the pieces with you if you plan to add little bits here and there where you find pockets of time.
.
STEP 2: Attach the Strips of Tulle to the Skirt
First, you'll need to map out the white "belly" portion of the skirt. As noted in the strips calculation above, my white section is 12 holes across. To ensure it's centered, I laid the crochet tutu top down with the seam centered in the back. Using that as a guide, I counted 6 holes to the right and 6 to the left, tying a white strip of tulle through the holes at the end of each direction. You may continue filling in this section with your three rows, or start at the hole next to one of your markers and begin working in your red strips.
How do you tie the tulle to the crochet top? I could explain it here, but we’ve already had some wonderful tutorials explaining how this is done. Check out this tutorial (Steps 2-5) for my favorite set of instructions on how to tie the tulle to the tutu top. I also like to have my crochet tutu top on a dress form, tube, or anything that will hold it taut while I'm working. For this project, I used my trusty Oatmeal canister! It was just the right height and width for this top.
If you need help with adding rows, check out how to add rows here. Note that while the instructions for that tutu dress have you work one row at a time all the way around the crochet top, I prefer to tie a full column at a time. I start with the lowest hole, then tie the next strip on top of that, and then the third above that. Then I move to the next column, starting at the bottom and working up the other two rows. (Though you'll see in the picture below a few ties added side by side instead of in the column - I was testing out both to see which I liked better.)
See what works for you and go with it! In the end, you need three rows of tied tulle strips – it will get tricky at the end as this skirt is FULL! If you start running low on tulle, feel free to skip a knot here and there. The fullness of the skirt will mask the exclusions.
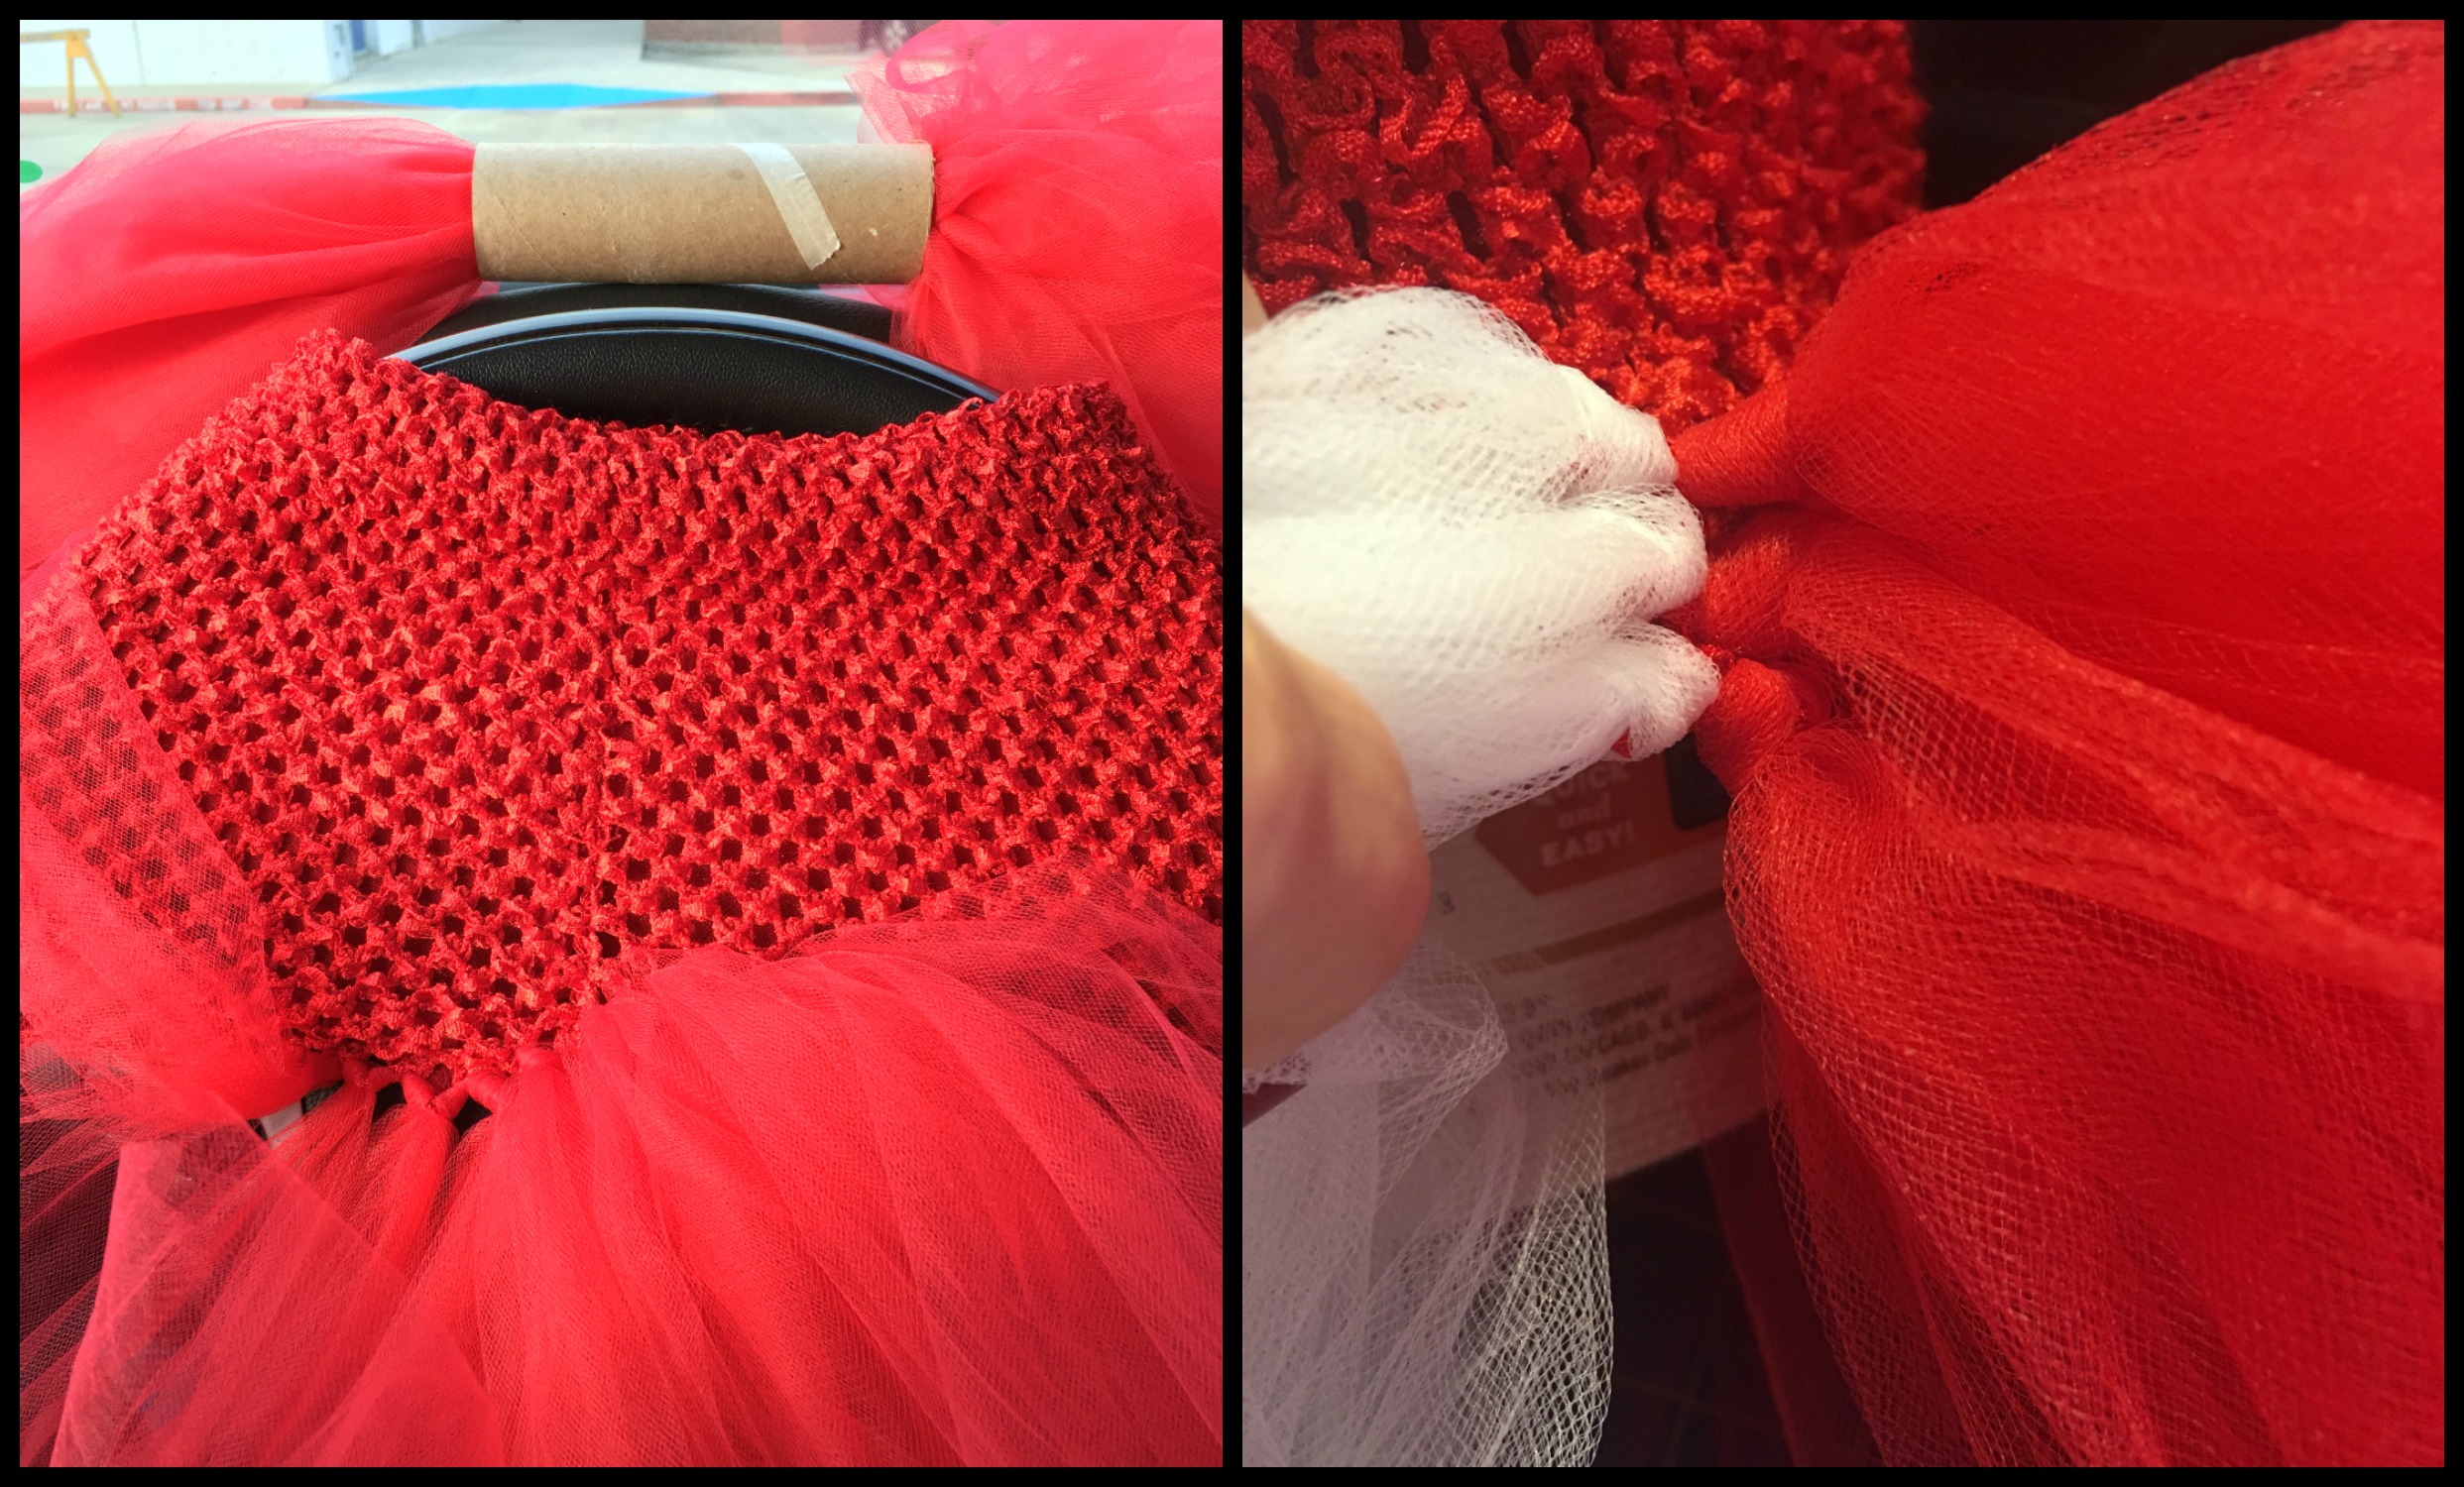
TIP: Finding time to complete these tutu dresses can be a challenge, especially when you've got an active family or packed schedule. The nice thing about these is that they're very forgiving and travel fairly easily, especially using the empty tube to hold the cut strips for your skirt. In the picture on the left above, Since I had a half hour's wait in the car while my daughter was in her French Horn lesson, I utilized my car's steering wheel as my mannequin to hold the tutu top in place, and had the tube holding the strips on the dashboard. Improvise to use the resources at hand!
.
STEP 3: Red Bird's Eyes (this is the trickiest part!)
Please do not get spooked by this part of the tutorial! This part can be tricky, and you may get frustrated if the shape of the eyes just isn't looking quite right. It took me several tries to get the eyes as you see them here. I will suggest, though, that if you just really do not feel as though you're up for tulle weaving and shaping, you can find a pattern for Red's face online, cut it out in felt pieces, and glue them on the crochet top's front with fabric glue. If you do that, skip down to Step 6 to add the tail bow and shoulder straps. For those who wish to give the tulle-puff eyes a whirl, carry on!
Red Bird's eyes are so angrily expressive, and also very cartoonishly big. I knew tulle was the way to go with them, and after a few false starts, this is what I ended up doing:
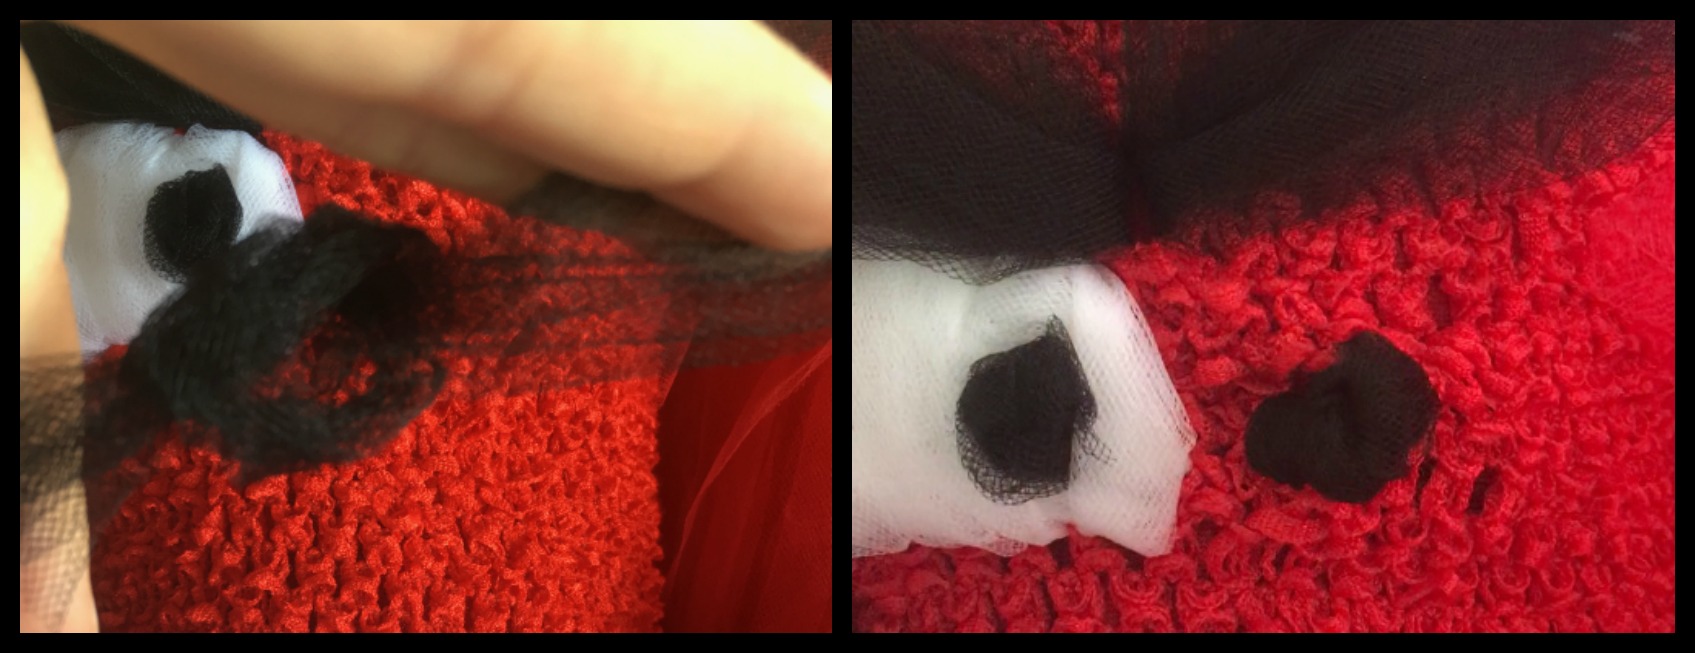
For the pupils, I tied a small strip of black tulle in to two loose knots, then shaped the resulting ball in to as much of a round shape as I was able. Using the tails of the knot, I tied the pupil to the crochet top where I thought it should be. Trim and tuck the tails in between the crochet fabric and the lining. I used the center part of the white section of the skirt to help me determine placement. (Ignore the eyebrows - we'll get there after the eyes are done!)
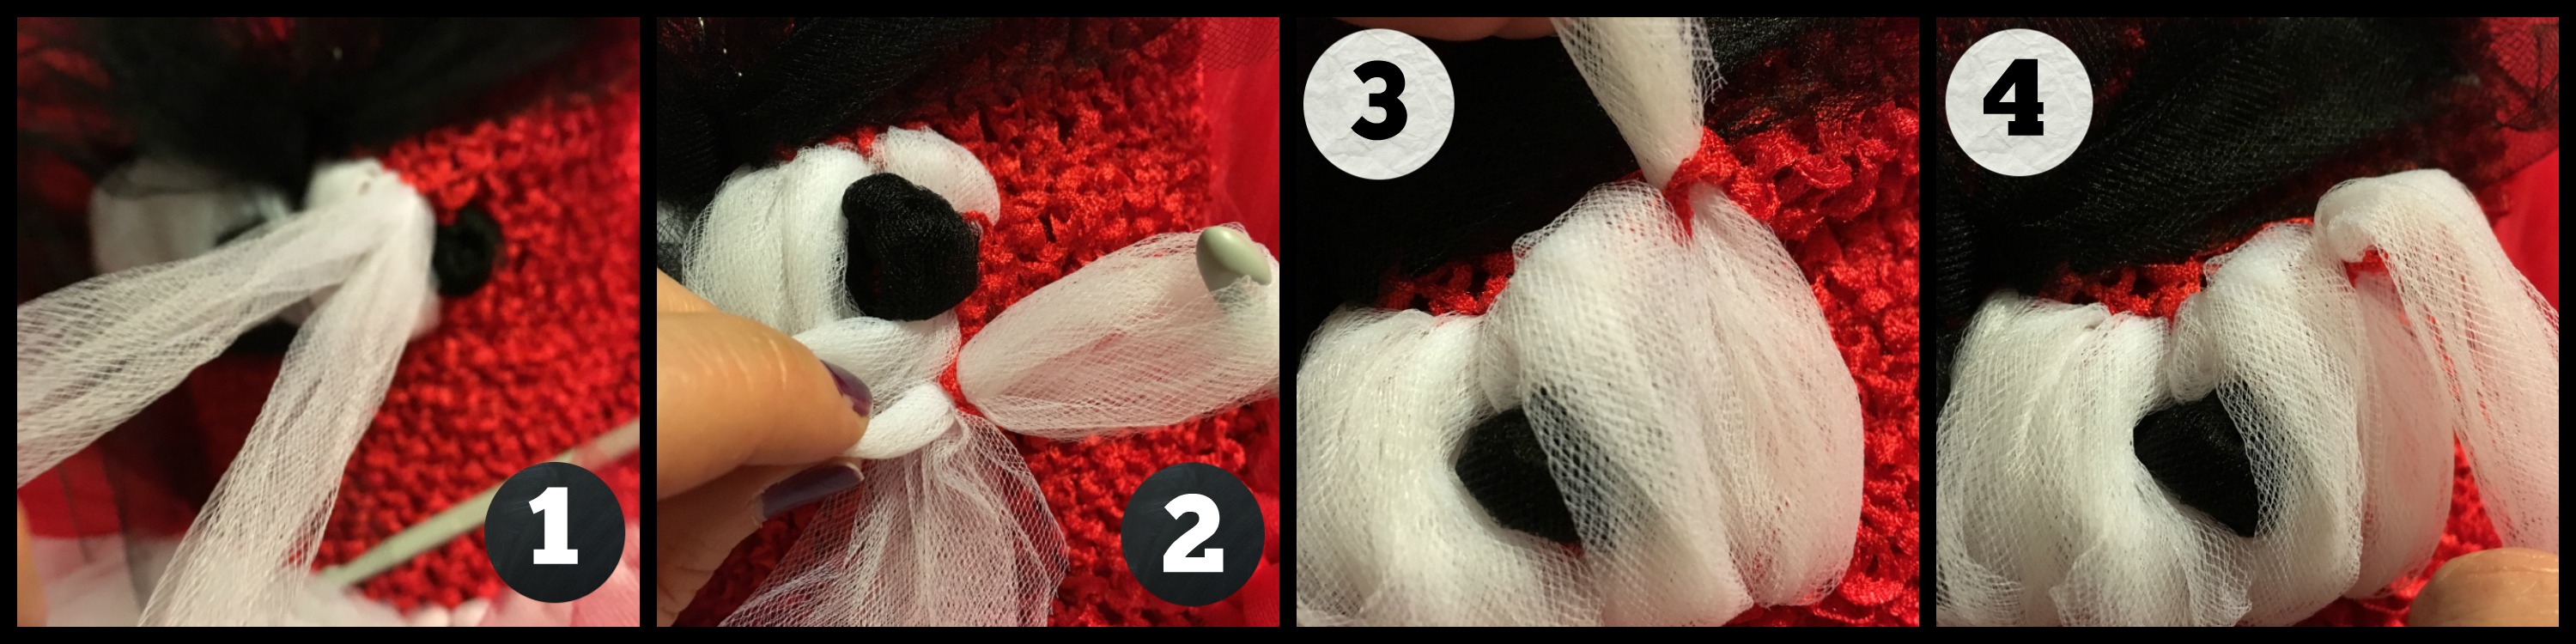
The eyeball was a little trickier to get looking right, but what I found worked best (after starting over several times) was to fold a long strip of white tulle (approximately 72" long, or 36" after folding in half) and weave the doubled tulle (1) up and down the height I wanted for the eyes (5 rows tall).
Because I wanted the eyes to stay puffy and not get flattened by pulling the tulle through the holes, I held on to the back end of the tulle (2) that had just been made in to an eyeball strip as I pulled the tail through. This kept the completed section from getting tugged flat.
To get the rounded look, insert your crochet hook from the outside of the eyeball, through the hole toward the inside of the eye. Pull the tulle through the hole, resulting in the tail pointing away from the eye (3). Then bring the tail up and over the hole you just pulled it through (4), and repeat in the opposite direction on the bottom of the eye.
Getting the white around the pupils was the hardest part, but I worked that out by making the white rows on either side of the pupil, then pulling the tail back horizontally (1) both above and below the pupil knot, under the vertical strips I had made. This is also how you finish off the eyes. Just tuck trim then tuck the remaining part of the tail under the rest of the white part, and in between the crochet fabric and the lining as you did with the pupil tails.
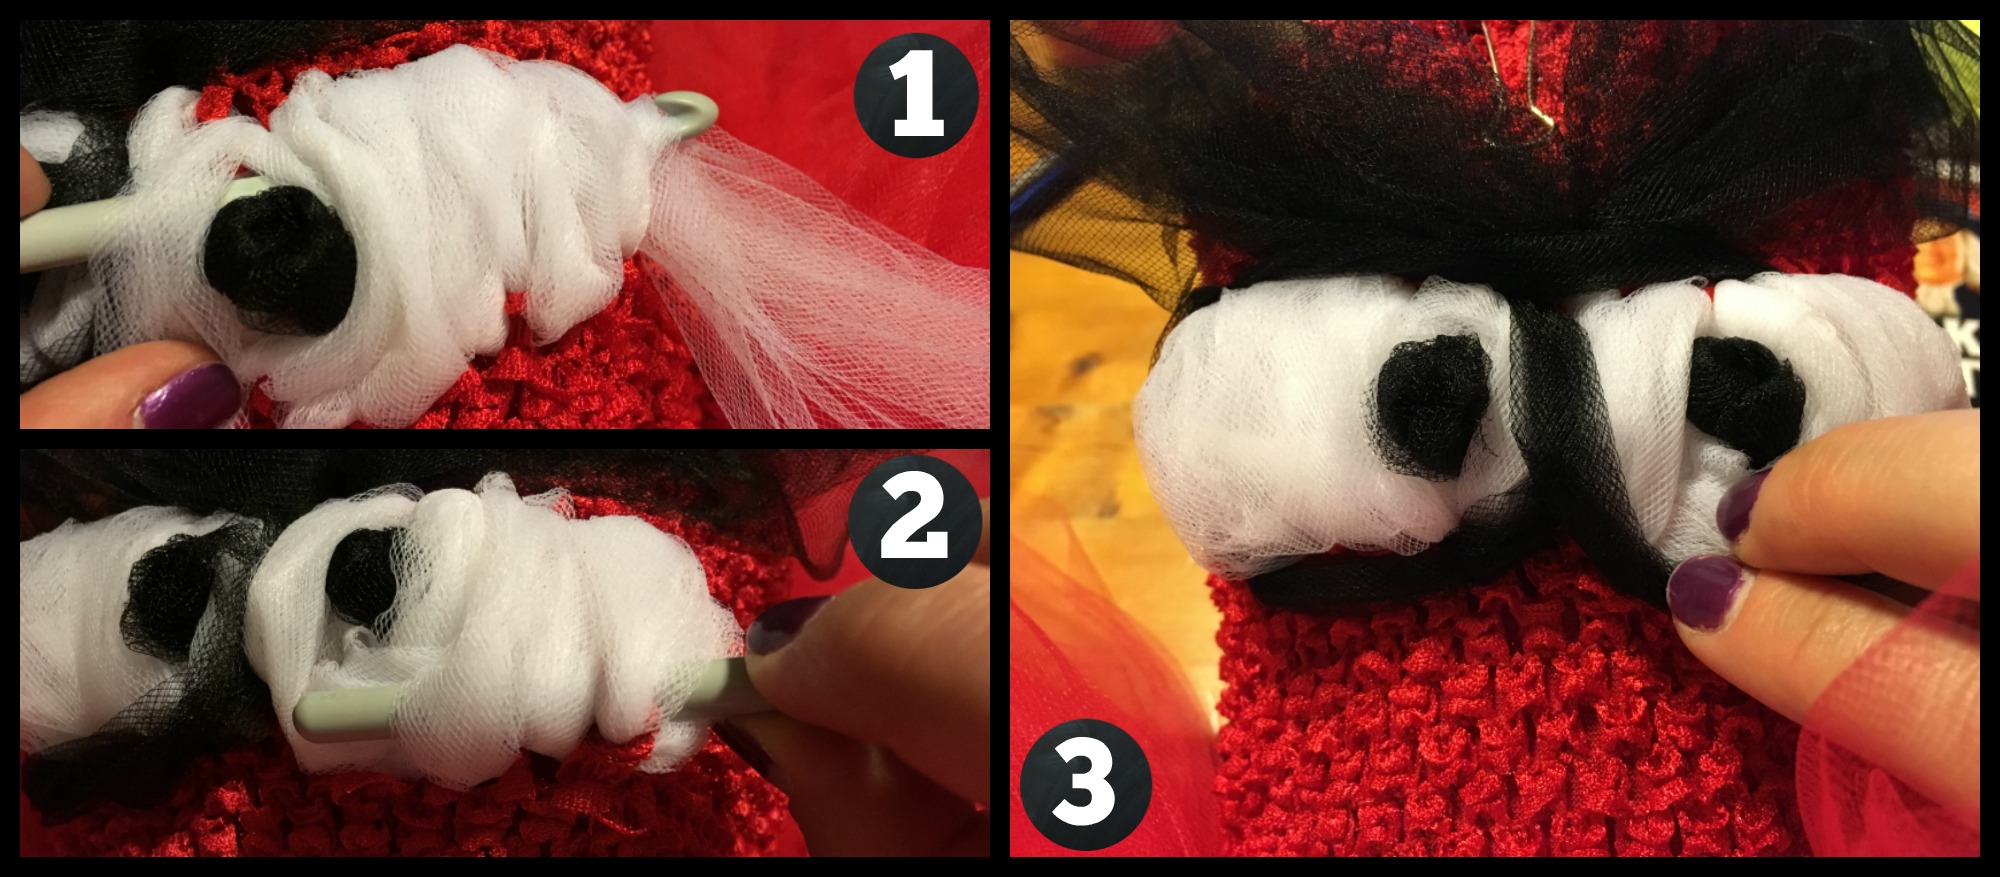
Because of the inevitable tug on the white tulle as you're creating your strips up and down, there will likely be parts of the eye that look a bit more flat than others. Using the back end of your crochet hook, opposite the hook, slide the hook under a few strips of tulle and 'puff' the tulle out. (2) If you've ever fixed your hair in a hair bump style, this is similar in idea to rounding out your hair with the tail end of your rat tail comb. Just insert the end of the hook and lift with even pressure to level out the strips. You'll find yourself adjusting here and there on the eyes throughout the project.
Now it's time to apply the eyeliner! Wrap a bit of black tulle loosely around the eyes in an 8 formation to measure out about how much you'll need. (3) Add a little extra length, then attach one end of the tulle with the same tie method as you used for the skirt, though do not double the tulle, and try to get the knot as close to the edge of your strip as possible. I started at the top between the eyes, knowing the eyebrows would help disguise any visible signs of the end of the tulle where it is secured. You can either dab just a tiny bit of fabric glue (or hot glue) right up against the edge of the eye and crochet top where needed to anchor the black tulle, or use the same weave-up-and-over method we used for the whites of the eyes to anchor the black around the curves. Tuck the end under the tulle you started with, and then in to the crochet top. Again, you can use a dab of glue if you feel it will be needed to firmly secure the tulle in place.
.
STEP 4: Red Bird's Eyebrows
Now that you've got the eyes, we need to add the eyebrows. Red Bird is, well, angry! This means his eyebrows are always in somewhat of a "V" shape. To make our eyebrows sit in the correct shape, we will make a wide bow, then secure the center down slightly under the "eyeliner".
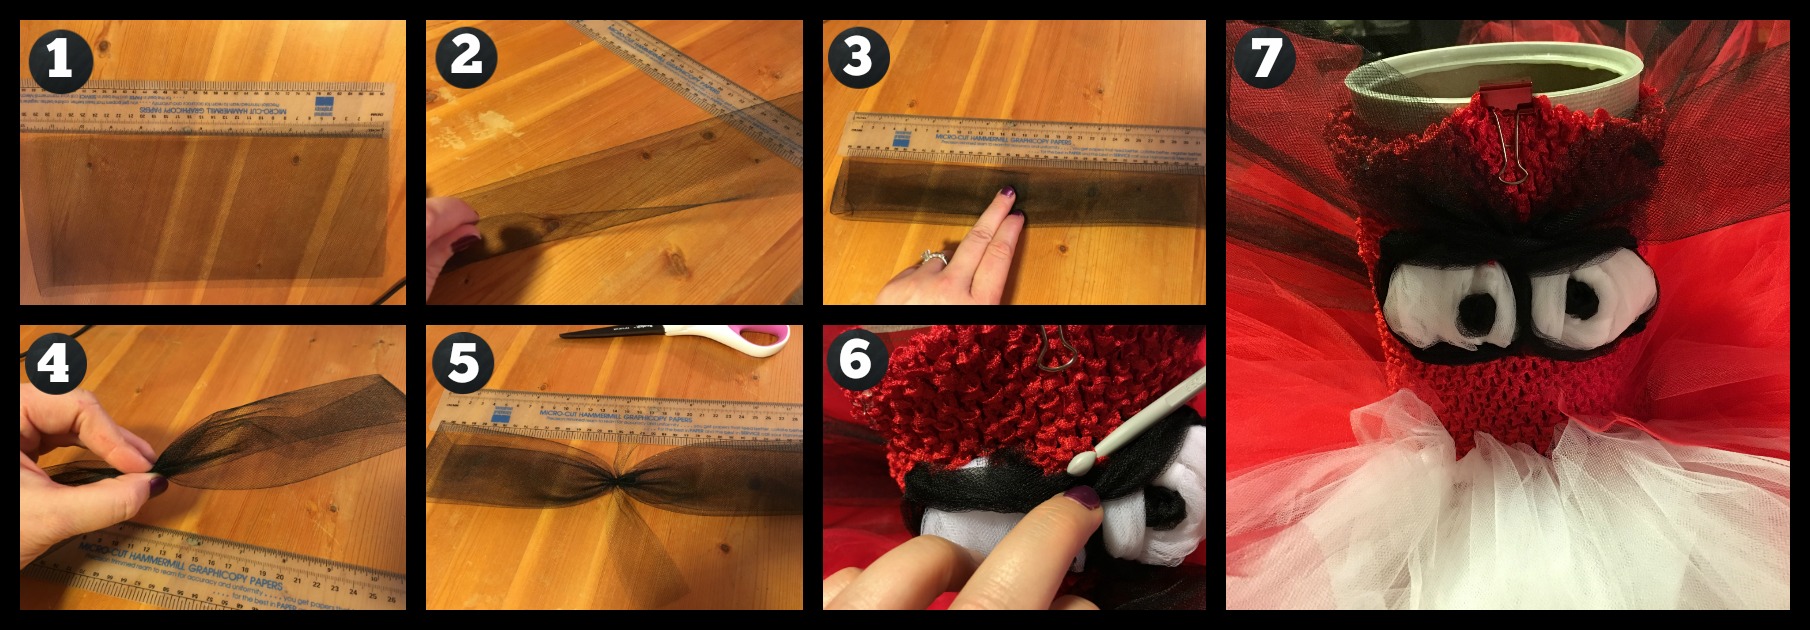
(1) Measure out 72" of black tulle, fold in half
(2) Fold halved tulle in to thirds, lengthwise
(3) Bring the ends in to the center, overlapping slightly
(4) Pinch the center together (or fold in an accordion fashion)
(5) Tie a small strip of black tulle around the center to hold everything in place
(6) Find a hole just under the "eyeliner" at the top center of the eyes, and using the tails of the small strip of tulle, tie the eyebrow (bow) to the crochet top. Tuck in the tails.
(7) Shape as needed
.
STEP 5: Red Bird's Beak
We're going to change things up just a little bit here and use Tangerine colored grosgrain ribbon instead of tulle. Using just a slight bit of origami skills, we'll shape the 1.5" ribbon in to the top and bottom parts of Red's beak.
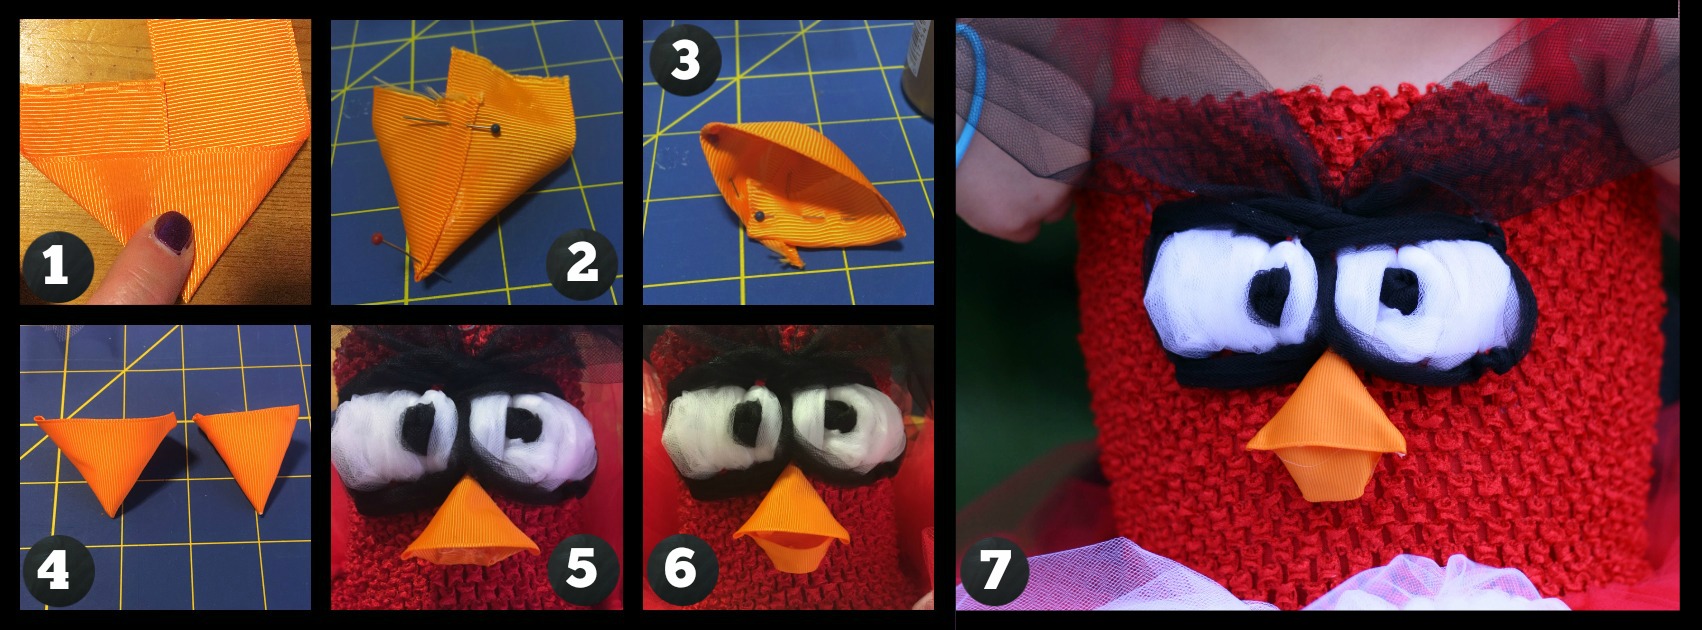
(1) Fold the tails of the ribbon up, bringing the edges from the same side together in the center of the formed triangle
(2) Pin the sides together, slightly overlapping, apply a bit of fabric glue and allow to dry (or use hot glue if you prefer)
(3) Fold the tails in to the center, shaping the edge angles of the beak as needed. Pin and glue.
(4) Repeat for the lower half, making the second triangle a little more narrow than the first
(5) Secure the larger triangle, point side up, to the crochet top. Position the point right up between the eyes. Glue with fabric glue and allow to dry, or use hot glue.
(6) Push the tip end of the smaller triangle up in to the center to give the lower side a flatter look. Glue in to place, slightly overlapping in the back with the top half.
(7) Add just a dot of glue to the inside of the upper half and glue the bird's mouth shut. :)
.
STEP 6: Red Bird's Tail
While this is a bird costume, it is still a tutu dress. No tutu dress is truly complete without at least one bow. Red's three black tail feathers provided the perfect excuse to add a big, giant bow to this tutu dress! Follow the instructions in this Tulle Bow Tutorial to create a 12 1/2" bow. I used my cutting board to wrap the tulle around as it is 12 inches from top to bottom. (I didn't do so here, but feel free to add a rhinestone center to the bow as shown in the Tulle Bow tutorial!)
For the tails of the bow, I cut an additional 25" strip and a small 4"" strip of black tulle. Folding the larger strip in half, I tied the middle of the folded tulle to the center of the tulle bow with the small strip.
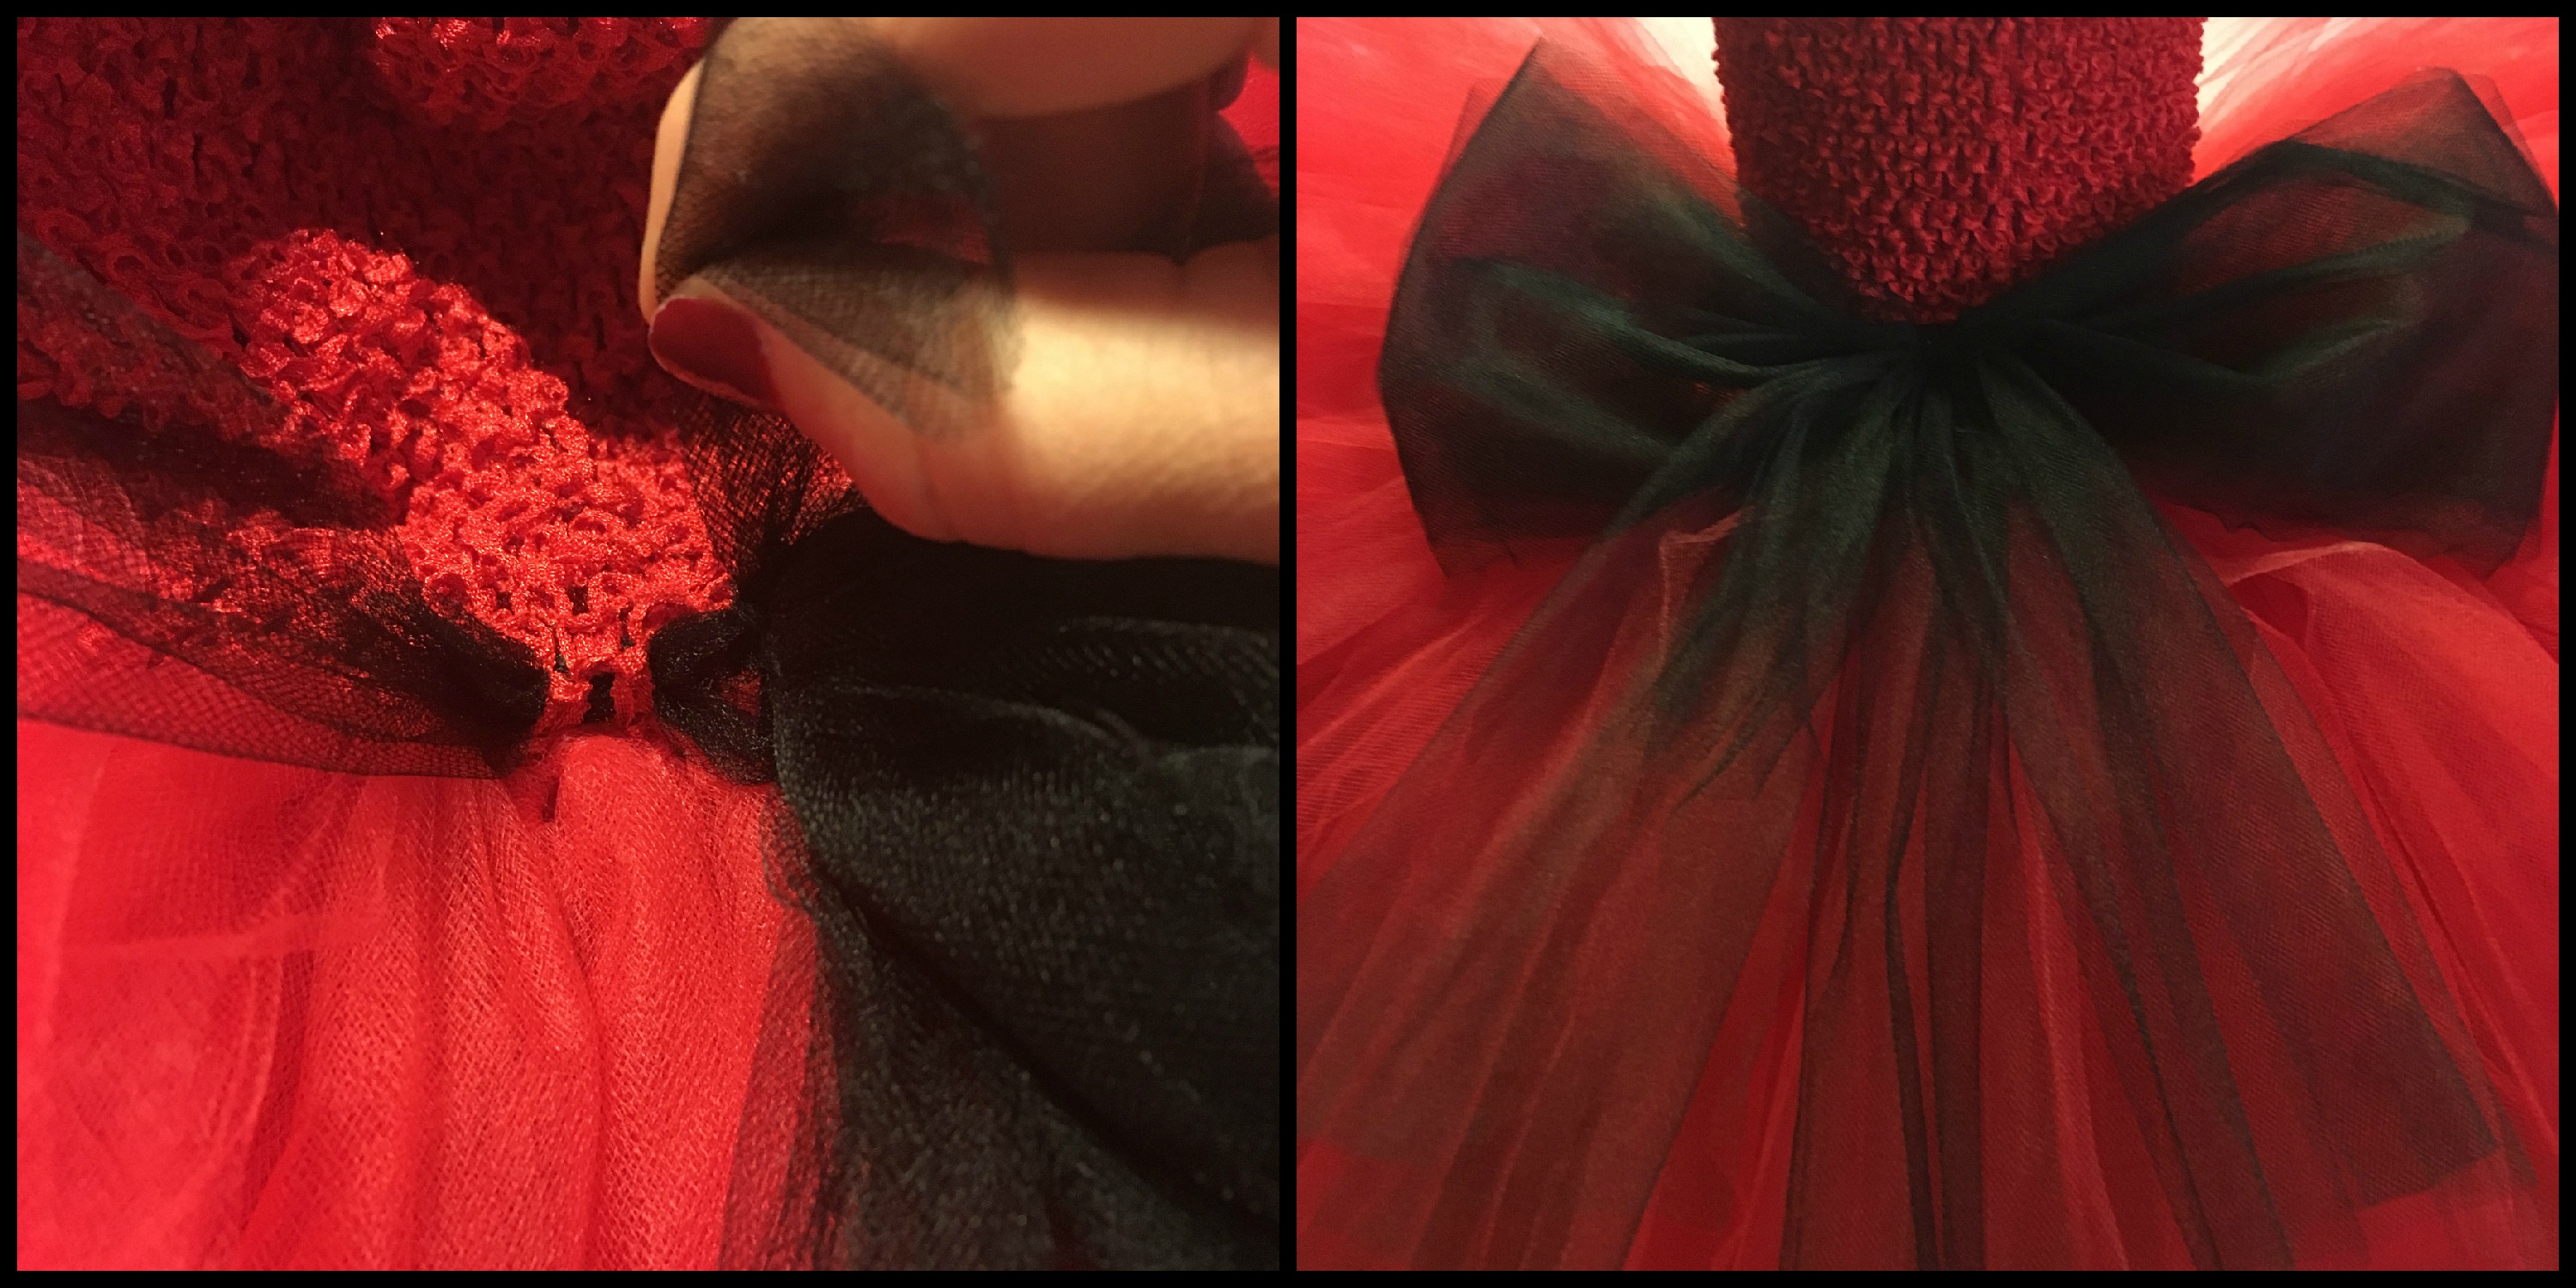
To secure the Tail Bow to the dress, find the seam in the back of the crochet tutu top and count 4 rows up from the skirt line. This allows the bow to sit vertically on top of the fluffy tutu skirt, rather than ending up horizontal due to the fullness of the skirt. Using the tails of the small strip used to tie the longer tails on to the bow, tie the bow to the crochet top, tucking the residual tail bits in to the crochet top after trimming them down.
.
STEP 7: Red Bird's "Wings"
With a skirt this fluffy, the shoulder straps just HAD to match! To make the shoulder straps for this dress, I used the same general method used on the Mouse Tutu Dress.
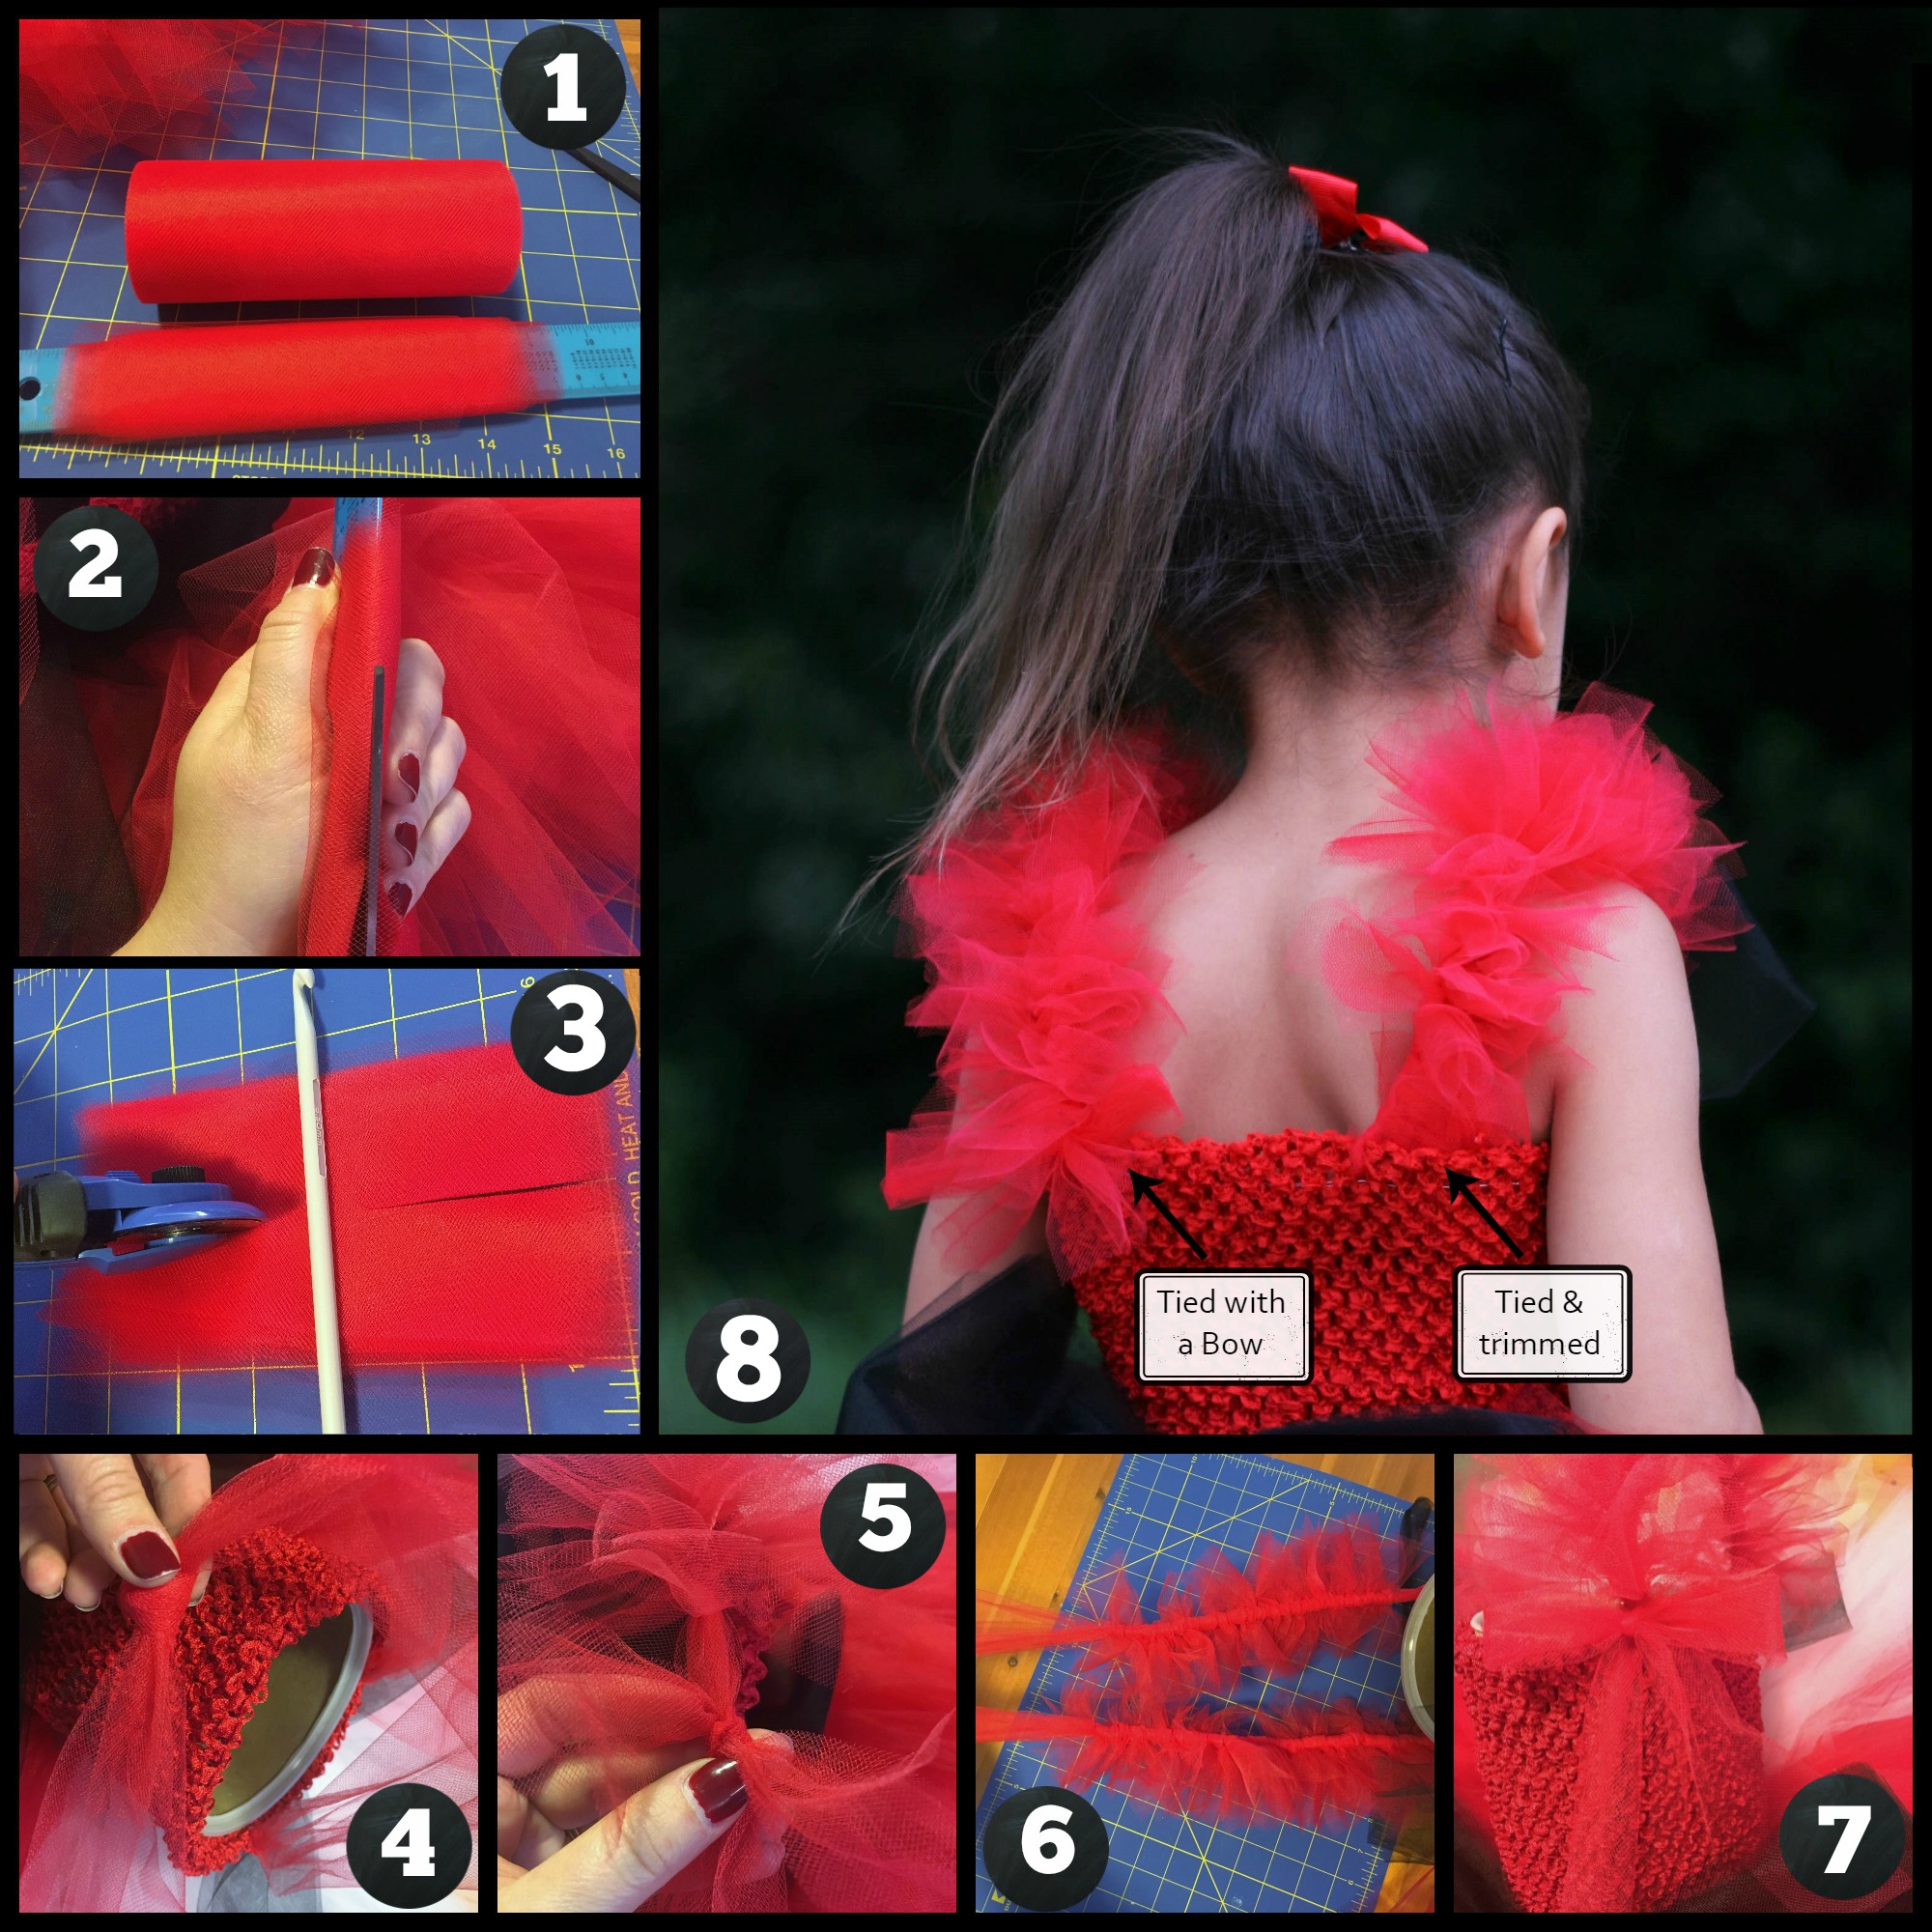
(1) As a variation to wrapping the tulle around a box or binder for the skirt, I wrapped it around a ruler to get strips slightly over 2" wide.
(2) Using the ruler also allowed me to slide the scissors most of the way up the inside of the tulle for easy cutting.
(3) This picture shows that I have cut the 2" strips in half to make a bunch of 1" strips. I discovered later that I could use my cutting wheel to cut from each end of the tulle, leaving the center attached. This resulted in four 1" strips all attached in the middle. It's much easier to work with half as many strips!
(4) Measure and cut 40" of red tulle, fold in half, and secure to the front of the dress for a shoulder strap in the same way as you attached the skirt tulle strips. Repeat for the 2nd shoulder strap. Tie a knot about 14" from where the strip is attached to the dress in the front. This is about how long your shoulder strap will be, and the length you'll need to tie the smaller strips to.
(5) Tie each strip to the shoulder straps. If using the 2" strips that are cut down the center except in the middle, fold in half lengthwise first so it looks like 2 1" strips, and then tie to the shoulder strap. You can tie it and then slide it over against the strips already tied to the shoulder straps. Fluff and separate the strip ends as you go.
(6) Lay the straps flat next to each other when you think you've done enough to ensure they are even. The tighter you push the strip ties together, the fluffier the shoulders will be and the more tulle you will use. Untie the placeholder knot you tied in the strap.
(7) Because I did not have the model with me to get an exact measurement for the shoulder straps, I made sure I had extra tails at the end of the strap (beyond the knot) so I could adjust the length of the strap once the model put on the dress. To secure the straps, bring the tails through the hole 2nd from the top in the back, going from outside to inside. Separate the tails and bring them around the sides of the shoulder strap and tie the tails in a neat bow on both sides. Trim to tails to match, or tuck in to the top of the dress. Alternatively, you can tie off the ends and trim them to the same length as the shoulder puff strips, and the ends will blend in with the rest of the tulle, as shown on the left shoulder strap in the large picture above.
TIP: If you position the front of the straps wider than the back of the straps, the straps are less likely to slide off the shoulders.
.
Your Red Angry Bird Tutu Dress is Complete!
If you steam the tulle on the skirt, it will really fluff up and be soft. But, it is also fine as it is. Adjust the eyes as needed to ensure all is straight and puffed just right. We added a black pair of Lace Trim Leggings to complete the look for our model. She's also wearing our Red Pinwheel Hair Bow and a great big SMILE!
Please be sure to show us what you've made - whether it's a replica of this dress, or a dress inspired by any of the techniques laid out in this tutorial. And be sure to post your questions so we can help you along as you work through your project!
Thank you for spending time with us today!