

Twirly Rockstar Tutu Dress
Posted by The Hair Bow Co. on Jul 24th 2015
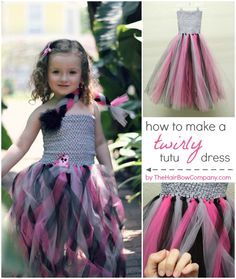
I am so in love with this twirly tutu dress. Tutu dresses can look complicated (and some of them are!) but they are usually pretty darn easy. This dress is a simple tutu dress with the strands lightly braided. It looks like a mess as you're working on it, but when it's done, it's fantastic! The braids look like fun twirls!
Let me show you how it's done!
First, just make a normal tutu dress. We've been through these instructions a thousand times, but here they are one more time.
Gather your supplies: tulle, a crochet headband, scissors, a measuring tape, and a crochet hook. If you haven't already, be sure to check out our Tutu Making Kit. It comes with a book or ideas and instructions, notepad, pen, crochet hook, and measuring tape.
I used one spool each of black, hot pink (it's called AM Beauty on our website), and silver.
Determine how long you want your dress to be. For the twirly look, add a couple inches. The braids will take away some of the length. Cut tulle TWICE the length! If you want your dress to be 24" long, cut your strands of tulle 48" long. I like to wrap my tulle around a flattened box and cut all at once, rather than cutting one strand at a time. If I want my dress to be 24" long, I find a box that is 24" when it's flattened. Wrap wrap wrap. Then cut ONLY ONE END. Ta-da! Now you have a pile of 48" tulle strands!
Follow the pictures above to knot the tulle. Start by pushing your crochet hook in a hole on the bottom row, up through a hole on the second row. Don't overthink it. Look at the pictures and just give it a shot! Keep going all around the dress. I alternated colors: pink, black, silver.
One you have your dress complete, it's time to make the twirls. I did my dress one layer, but in retrospect, I wish I had made it two layers.
Grab a strand of each color. Don't grab strands that are right next to each other. If you want big twirls, they need to be spread out a bit. Loosely braid them and knot them at the bottom. Check out this pic.

It'll look like a disaster as you're doing it. I stepped out of my office a few times so that I could walk back in with fresh eyes. I promise it will end up looking great!
Add whatever you want to the top. I looped a strand of each color into holes on the top (both on the front and back), and then braided them. I pulled them across the model's torso and secured them in place with an elastic hair tie.
I added a marabou puff and a skull clippie to complete the rockstar look! I love it, she loved it, this dress is a WIN!